
Free Christmas Card Pattern from Judie Bellingham

These cards are very easy to make, yet they look fantastic with the lovely patchworked finish.
You will need:
- Various scraps of fabric in light, medium and dark reds
- Various scraps of fabric in light, medium and dark greens
- Various scraps in beige
- 10 cm Vliesofix (see Glossary at end of this article.
- 2⅞” x 2⅞” square scraps of cream Aida cloth or even-weave fabric (See Glossary at the end of this article
- Pencil and paper scissors
- Sharp fine scissors for cutting out fabric
- Hot iron
- Teflon mat(optional)
- Glue Stick (that dries clear)
- A5 (4 3/8" x 6 1/8") blank cream card and matching envelope
- A5 white paper inset (optional)
- A selection of 2¾” x 2¾” Christmas green, or Christmas red light weight cardboard squares
Basic Instructions:Choose your pattern, trace pattern onto fusible paperbacked web. Iron onto fabric and cut out. Place onto aida cloth. Fray aida cloth. Trim frayed edges around aida cloth.Mount pattern onto chosen cupboard using glue stick. Mount pattern/cardboard onto your card.
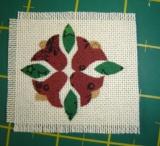
In depth Instructions:Choose your pattern from the templates. Either the Holly Leaves, Christmas Bells or Christmas Baltimore. You may even design your own motif. (For the purposes of this set of instructions, I am going to refer to the Christmas Bells pattern).
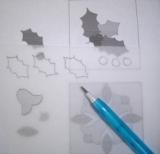
Step 1. Trace the pattern shapes onto the smooth side of the fusible paperbacked web. Trace each shape in groups to make it easy to iron them. Check how many leaves, tulips, buds etc you’ll need for your pattern (see template sheet). For the Christmas Bells you’ll need four red tulips, 4 beige tulip buds and 4 green leaves. Leave a reasonable space around each shape as you trace for easy cutting out.
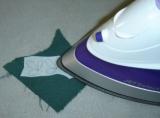
Step 2. Roughly cut about 1/4" around eache group of leaves and other shapes, and place them onto the WRONG side of your chosen green fabric. Iron the webbing onto the fabric using a hot iron and your Teflon mat (optional). Do the same for the tulips and the tulip buds, with each of your chosen fabrics. Make sure when ironing that you’re ironing them to the wrong side of your fabric.
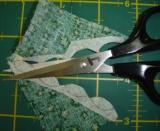
Step 3. Now for the important bit – very carefully, using your fine sharp scissors, cut out each of the shapes, cutting on the line. The neater you cut these shapes, the prettier your final card will be.Put them aside together in a safe place and be warned – they’re small pieces and can easily get lost. It might be a good idea at this point, to turn your fan off – these pieces can easily become airborne!!
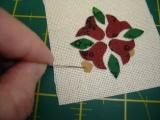
Step 4.Now it’s time to set your shapes onto the aida cloth. Place the aida cloth in front of you and gently peel back the paper from the fabric shapes and place them into position on your aida cloth. Because these are such little pieces, I find it’s much easier to use a long pin to manouvre and put them in place – my fingers are just too clumsy for this job.
Step 5. Centre the pattern on the aida cloth, and place the shapes equally apart from each other. There should be an equal amount of threads of aida cloth between the edge of your pattern and the edge of the aida cloth.
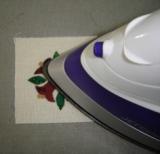
Step 6. Now, using the hot iron again, carefully press the pattern pieces into place. Be sure they don’t move as you’re ironing them down. Ta Daa! Your lovely pattern is fixed to your aida cloth.

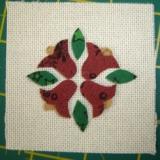
Step 7. We are going to make the aida cloth pretty and ready for mounting on the colored card. Starting on one side of the aida cloth, and using a pin, gently fray one thread at a time up to two (2) threads from the edge of the pattern.LEAVE 3 THREADS BETWEEN THE PATTERN AND THE BEGINNING OF THE FRAYED LINE.Do likewise with the other three sides.
Step 8. Now trim to neaten. Using your rotary cutter and your ruler, carefully trim the frayed edge to 1/4" on all sides. Phew! Pattern finished, now we just have to put the whole card together.

Step 9. Using your choice of red, green or red and green cards and your glue stick. Mount the aida cloth onto the cardboard, using your eyes to centre it. Using the glue stick, glue the back of your aida cloth. Not too much glue or it will come through to the front. Just enough to keep it in place and not drop off! It is important to use a glue stick that dries clear for this project.
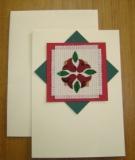

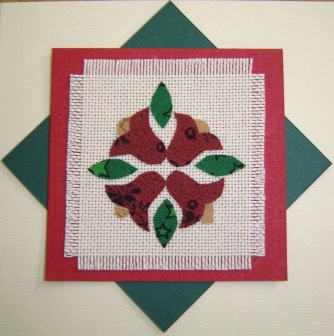
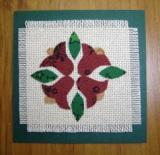
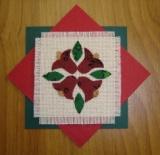
Step 10. You can have the cardboard placed straight up or on point. See Photos. Sometimes, I use both red and green cardboards to make a pretty display. It’s up to you. Go on experiment, it’s fun!
If you wish you can place a paper insert into the card. Your measurment for the paper insert is 1/4" less than the size of the blank card. Just fold the insert in two and gently glue two dots on the back sheet of the paper insert near the folded edge, top and bottom, and mount it on the right side of the card. No need to glue the insert anywhere else. In fact if you glue it too much, it won’t sit right.
Well done, you now have a beautifully handmade Christmas card to give to your family and friends. It didn’t cost much and it’s a great way to use up those little scraps! Have fun!
Glossary
Vliesofix - Fusible Paperback web Vilene
Aida Cloth- Aida cloth is an open weave, even-weave fabric traditionally used for cross-stitch embroidery.
You Should Also Read:
Free Christmas Patterns

Related Articles
Editor's Picks Articles
Top Ten Articles
Previous Features
Site Map
Content copyright © 2023 by Judie Bellingham. All rights reserved.
This content was written by Judie Bellingham. If you wish to use this content in any manner, you need written permission. Contact Judie Bellingham for details.

