Masking Fluid Resist Technique

In another article elsewhere on this site, we looked at how we can use embossing powder as a resist when making cards and similar projects. This time around we'll take a look at how masking fluid is used as a resist.
Masking fluid, available in art supply stores, is used by water color artists to mask or protect part of their painting that they want to keep white or to preserve the color that has already been painted on. It's made of liquid latex, spreads readily, and dries fairly fast, especially in warm climates. Depending on the manufacturer, masking fluid can be either clear or tinted; it's easier to use the latter since you can see where the masking fluid was applied.
Masking fluid is perfect for masking fine, intricate designs and can even be used for writing, a technique which calligraphists use to great effect. Let’s take a look at these two applications.
You will need:
* Water color paper or white cardstock
* Masking fluid
* Old paint brush
* Dishwashing liquid
* Small container like a bottle cap
* Dip pen or mapping pen
* Rubber stamp
* Stamp pad
* Watercolor
* Watercolor brush
* Water
* Paper towel
* Heat gun (optional)
Masking a stamped design

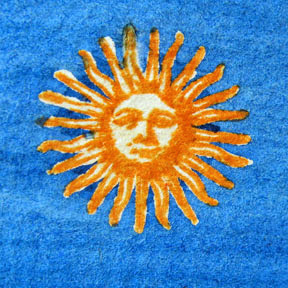
On a piece of cardstock or watercolor paper, stamp an image and set it with a heat gun if needed. Dip the old paint brush in a small amount of dishwashing liquid, work it into the bristles, and wipe off the excess with a paper towel. This will make it easier to clean the brush later on.
Pour a small amount of masking fluid into a container like a bottle cap, dip your brush into this, tap off any excess fluid and proceed to carefully paint over the stamped image until it's covered. Let this dry completely.
Wash your brush immediately after use so that it doesn't harden, and make sure to close the bottle well. Toss any unused masking fluid; don't pour it back into the bottle.
Next, paint or stamp over the background. In our example, a dark blue watercolor wash was painted on, although you can use other techniques like spattering paint with a toothbrush or pouncing an ink pad on the paper.
When using masking fluid it’s important that your paper is completely dry before you remove the mask, or the paper could come off with the mask. Gently rub or peel off the masking fluid using your fingers or a rubber eraser. The stamped design on the original uncolored background will be revealed. You can then continue painting in the details of the stamped image, or leave it as it is.
Writing with masking fluid

You can use either a brush or a pen with this method, although personally I prefer using a dip pen or mapping pen because it offers more control.
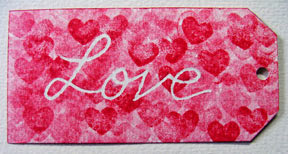
Cut a piece of cardstock or watercolor paper to the desired shape and size. Pour a small amount of masking fluid into a small container, then dip the brush or pen into the masking fluid. Write on the cardstock or watercolor paper, replenishing the masking fluid as needed. Let it dry completely, then ink up a rubber stamp and stamp randomly over the writing until the entire piece of cardstock or watercolor paper is covered. Let dry completely, then remove the masking fluid.
Masking fluid, available in art supply stores, is used by water color artists to mask or protect part of their painting that they want to keep white or to preserve the color that has already been painted on. It's made of liquid latex, spreads readily, and dries fairly fast, especially in warm climates. Depending on the manufacturer, masking fluid can be either clear or tinted; it's easier to use the latter since you can see where the masking fluid was applied.
Masking fluid is perfect for masking fine, intricate designs and can even be used for writing, a technique which calligraphists use to great effect. Let’s take a look at these two applications.
You will need:
* Water color paper or white cardstock
* Masking fluid
* Old paint brush
* Dishwashing liquid
* Small container like a bottle cap
* Dip pen or mapping pen
* Rubber stamp
* Stamp pad
* Watercolor
* Watercolor brush
* Water
* Paper towel
* Heat gun (optional)
Masking a stamped design
On a piece of cardstock or watercolor paper, stamp an image and set it with a heat gun if needed. Dip the old paint brush in a small amount of dishwashing liquid, work it into the bristles, and wipe off the excess with a paper towel. This will make it easier to clean the brush later on.
Pour a small amount of masking fluid into a container like a bottle cap, dip your brush into this, tap off any excess fluid and proceed to carefully paint over the stamped image until it's covered. Let this dry completely.
Wash your brush immediately after use so that it doesn't harden, and make sure to close the bottle well. Toss any unused masking fluid; don't pour it back into the bottle.
Next, paint or stamp over the background. In our example, a dark blue watercolor wash was painted on, although you can use other techniques like spattering paint with a toothbrush or pouncing an ink pad on the paper.
When using masking fluid it’s important that your paper is completely dry before you remove the mask, or the paper could come off with the mask. Gently rub or peel off the masking fluid using your fingers or a rubber eraser. The stamped design on the original uncolored background will be revealed. You can then continue painting in the details of the stamped image, or leave it as it is.
Writing with masking fluid
You can use either a brush or a pen with this method, although personally I prefer using a dip pen or mapping pen because it offers more control.
Cut a piece of cardstock or watercolor paper to the desired shape and size. Pour a small amount of masking fluid into a small container, then dip the brush or pen into the masking fluid. Write on the cardstock or watercolor paper, replenishing the masking fluid as needed. Let it dry completely, then ink up a rubber stamp and stamp randomly over the writing until the entire piece of cardstock or watercolor paper is covered. Let dry completely, then remove the masking fluid.
You Should Also Read:
Embossing Powder Resist Technique

Related Articles
Editor's Picks Articles
Top Ten Articles
Previous Features
Site Map
Content copyright © 2023 by Mia C. Goloy. All rights reserved.
This content was written by Mia C. Goloy. If you wish to use this content in any manner, you need written permission. Contact Mia C. Goloy for details.


