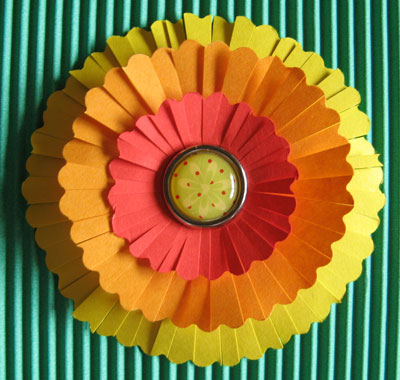
Layered Fringed Flower

This simple but festive layered fringed flower is easy to make and is suitable for greeting cards and scrapbook pages, or any project that needs a flower that is relatively flat. Our example measures 2-3/4 inches in diameter, but you can make smaller ones if you choose.
You will need:
* Paper in three different colors or patterns
* Circle templates, or compass, or jar lids in three different sizes (The example uses 1-1/2, 2-1/4, 2-3/4-inch circles.)
* Pencil
* Decorative scissors
* Scissors
* Anywhere punch (optional)
* Brad
With a pencil and template (or compass or jar lids), trace a circle onto the paper, one size per color or pattern. In our example, the large circle is yellow, the medium circle is orange, and the small circle is red.
Cut out the circles with the decorative scissors. Using the regular scissors, fringe the edges of one circle to form petals, cutting into approximately half the radius of the circle.
To make the cuts on the fringe more or less uniform and angled the right way, try this: Think of the circle as a clock face. Make the first cut at the 12 o’clock position, then the second cut at the 6 o’clock position. Next, make the third cut at 3 o’clock, then the next at 9 o’clock. Proceed the same way around the circle, cutting first on one side and then cutting directly opposite it, until you run out of clock numbers. If the resulting fringes are still wide, you can cut them further – one cut next to the other this time, without needing to jump to the opposite side.
Now fringe the other two circles in the same way. When you’re done, put the three fringed circles one on top the other, with the largest at the bottom and the smallest at the top, making sure that they are centered. Use an anywhere punch to make a hole in the center of the flowers (or use the tip of your scissors to prick a hole in the paper – not very elegant, but it works!), then attach the brad.
Gently bend the fringes of the two topmost layers upwards with your fingers, and bend those of the lowest layer downwards. You’re done! Attach the flower to your project with craft glue or double-sided tape.

Tips for designing your own layered fringed flowers:
Paper: Use cardstock for stiffer, sturdier flowers. If you can’t find printed paper that you like, make your own with rubber stamps and ink. Stamp randomly on the paper after you’ve cut out the circles.
Embellishments: Use ordinary brad-like paper fasteners for smaller flowers. Or, instead of using a brad, glue the centers of the circles together, then glue on a button. Flat-back faux gems are another option.
You will need:
* Paper in three different colors or patterns
* Circle templates, or compass, or jar lids in three different sizes (The example uses 1-1/2, 2-1/4, 2-3/4-inch circles.)
* Pencil
* Decorative scissors
* Scissors
* Anywhere punch (optional)
* Brad
With a pencil and template (or compass or jar lids), trace a circle onto the paper, one size per color or pattern. In our example, the large circle is yellow, the medium circle is orange, and the small circle is red.
Cut out the circles with the decorative scissors. Using the regular scissors, fringe the edges of one circle to form petals, cutting into approximately half the radius of the circle.
To make the cuts on the fringe more or less uniform and angled the right way, try this: Think of the circle as a clock face. Make the first cut at the 12 o’clock position, then the second cut at the 6 o’clock position. Next, make the third cut at 3 o’clock, then the next at 9 o’clock. Proceed the same way around the circle, cutting first on one side and then cutting directly opposite it, until you run out of clock numbers. If the resulting fringes are still wide, you can cut them further – one cut next to the other this time, without needing to jump to the opposite side.
Now fringe the other two circles in the same way. When you’re done, put the three fringed circles one on top the other, with the largest at the bottom and the smallest at the top, making sure that they are centered. Use an anywhere punch to make a hole in the center of the flowers (or use the tip of your scissors to prick a hole in the paper – not very elegant, but it works!), then attach the brad.
Gently bend the fringes of the two topmost layers upwards with your fingers, and bend those of the lowest layer downwards. You’re done! Attach the flower to your project with craft glue or double-sided tape.

Tips for designing your own layered fringed flowers:
Paper: Use cardstock for stiffer, sturdier flowers. If you can’t find printed paper that you like, make your own with rubber stamps and ink. Stamp randomly on the paper after you’ve cut out the circles.
Embellishments: Use ordinary brad-like paper fasteners for smaller flowers. Or, instead of using a brad, glue the centers of the circles together, then glue on a button. Flat-back faux gems are another option.
You Should Also Read:
Fringed Paper Flower
Paper Rose

Related Articles
Editor's Picks Articles
Top Ten Articles
Previous Features
Site Map
Content copyright © 2023 by Mia C. Goloy. All rights reserved.
This content was written by Mia C. Goloy. If you wish to use this content in any manner, you need written permission. Contact Mia C. Goloy for details.


