Five Basic Freestyle Embroidery Stitches

They couldn’t be more wrong!
Like all forms of embroidery, there are some basic stitches that you can master that will enable you to produce freestyle embroidery pieces as intricate and stunning as those that you have thought “too hard”.
I’m not going to deny that you will instantly be able to produce these – the trick with all of them is practice. You need to keep practicing to ensure that these stitches are worked as evenly and carefully as possible.
Stitch 1 – Stem Stitch
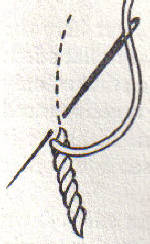
Stem Stitch is the most commonly used “line” stitch used in freestyle embroidery.
As the diagram shows, this stitch is worked over the line of the design. The width and length of each stitch depends on the angle it is worked over the line.
The thread can be kept either above or below the needle (it’s a personal preference and you will need to experiment to see which you prefer. I prefer below, myself), but it must remain in that place at all times whilst you are stitching to ensure that the stitches all look the same.
The beauty of this stitch is that it can also be used as a filling stitch as well as an outline stitch. When you use Stem Stitch for filling a pattern, the easiest way is to work it in rounds – complete the outline, and then work inwards from there. Ensure that you keep all your stitches going in the same direction, and that each line is worked as close to the first as possible. I always try to start each stitch in the “down” hold of the stitch in the previous row.
Stitch 2 – Chain / Lazy Daisy Stitch
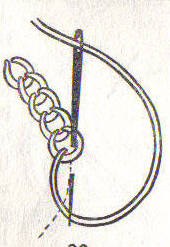
This is the first embroidery stitch that my grandmother taught me. Once you learn this simple stitch, you will discover all the other stitches in this family seem easier!
As you can see from the diagram, this stitch is worked in much the same way as Stem Stitch, except that the thread is looped under the needle and not pulled right through the fabric. The back of the fabric shows a neat line of back stitches.
Again, this stitch takes practice to ensure the chains are the same size and not too loose. This stitch can also be used as a filling stitch and, when using it to fill, use the same technique as with Stem Stitch.
Lazy Daisy stitch is also called Detached Chain. It is worked in the same way as Chain Stitch, except a small “anchor” stitch is worked at the end of the loop to hold the thread in place.
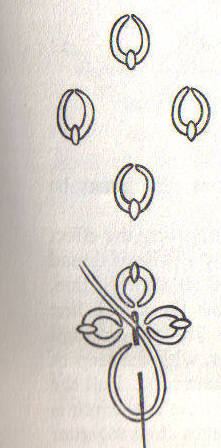
This is a very effective and simple stitch to use for both petals and leaves of flowers.
Stitch 3 – Satin Stitch
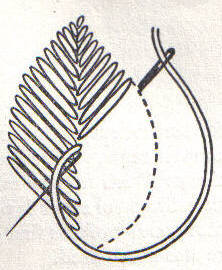
Of all the stitches, Satin Stitch (and it’s derivatives) is the one where you absolutely must take care and put in plenty of practice to make sure it looks its best.
Satin Stitch works best when it is worked with the fabric in a hoop or frame, and great care must be taken not to pull the threat too tight or the fabric underneath will buckle. Correct tension is vital, as loose stitches will wear and not have that “satin” look about it.
There are several ways to do this stitch. The most common (and that also uses the most thread) is as is shown in the diagram – where the stitch is made, and the thread carried on the back to the top of the shape, and the next stitch made. This will give an identical back and front.
The other way (and the way I tend to stitch it) is to stitch from both the top and bottom of the shape – when you place a stitch, bring the needle up as close as possible next to where it went into the fabric, and make the next stitch to the other side of the shape. This will leave, on the back, a series of small dots.
It is important with Satin Stitch that you keep your stitches along the outline even – I often stitch around the outline once I have finished satin stitching it with either stem or split stitch.
Padded Satin Stitch raises the stitch over the fabric. To stitch this, outline the shape using stem stitch, and then stitch over the shape, bringing your needle in and out of the fabric as close as possible to the outside of the stem stitch outline.
It is important to remember not to try to stitch too large a shape or the stitches will not keep their flat shape. If you have a large area to cover, either divide it into smaller areas, or use Long and Short Stitch (see below).
Once you have mastered Satin Stitch, you will find Long and Short Stitch easy – and this particular stitch is the basis of intricate needle shading.

As you can see from this diagram, the satin stitches do not cover the whole shape, and the first row of stitches alternate in size.
This means that the subsequent rows of stitches (the stitches should all be the same length) are still long and short. This enables very effective shading techniques to be used, with very little effort.
Stitch 4 – Buttonhole Stitch
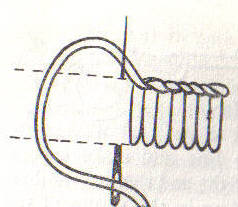
I love Buttonhole Stitch! It’s so versatile, and is used in so many different embroidery techniques that it’s probably the most used stitch ever!
Buttonhole Stitch is very effective used to edge a raw fabric edge, and it is used extensively for this purpose in cutwork embroidery.
It is also used in Crewel embroidery as Detached Buttonhole Stitch, which is a filling stitch (I will cover this in a later article).
Buttonhole stitch is a knotted stitch, and is simple to do. As you can see from the diagram, you simply stitch along a line, bringing the thread underneath the needle as it comes out of the fabric, causing a “knot”. It can be worked either upside down, as in this picture, of top down (with the “knot” at the bottom of the stitch). It all depends on how you are comfortable in stitching it.
Buttonhole Stitch is also called Blanket Stitch – although in that variation, there is usually a small space between each stitch.
Once you have mastered this stitch, there are many variations that you can explore.
Stitch 5 – French Knot
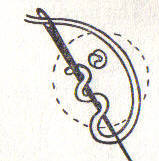
I feel a real fraud telling you about this stitch – it’s one that I’ve never really mastered and always find difficult. My embroidering friends tell me it’s easy.
With this stitch, how you’re comfortable in stitching it is important. It’s also very important that you keep the fabric taught, so that the stitch sits correctly.
Bring the needle and thread up, holding the fabric with the second and third fingers – leaving your thumb and first finger free to hold the thread. Hold the thread securely about an inch from where it came through the fabric and then use the point of the needle to wrap the thread twice around it. Keep the twist tight on the needle by ensuring the thread is held very taught. Turn the needle back on the thread axis until the point of it is close to where it first came through the fabric. Put the tip in as close to this point as possible (though not in the same hole) and, still holding the thread taught, draw the needle and thread tight. The result should look like a small bead on the fabric.
Yes – this one does require a lot of practice! However, it is the basis of the bullion knot stitch as well, which leads you to the beautiful grub roses made out of bullion knots.
And one day, I’ll master them both!
Like all embroidery, these stitches require practice – which is where your sampler comes in very handy. Practice to see how you prefer to stitch them, and experiment with shapes and designs, as well as different threads. You won’t be sorry to have mastered these five basic stitches!
Recommended Reading
Stitch Sampler: The Ultimate Visual Dictionary to Over 200 Classic Stitches by Lucinda Ganderton
Mary Thomas' Dictionary of Embroidery Stitches
Elegant Stitches: An Illustrated Stitch Guide and Source Book of Inspiration by Judith Baker Montano
Is there anything that you would particularly like to see an article on? If so, please contact me with your suggestions.
Happy Stitching

© 2008 Megan McConnell
This site needs an editor - click to learn more!
You Should Also Read:
Embroidery Forum
Embroidery Store
Related Articles
Editor's Picks Articles
Top Ten Articles
Previous Features
Site Map
Content copyright © 2023 by Megan McConnell. All rights reserved.
This content was written by Megan McConnell. If you wish to use this content in any manner, you need written permission. Contact
BellaOnline Administration
for details.


