Accurate Machine Piecing

This is the fourth of five articles on Accurate Rotary Cutting for Accurate Machine Piecing. The prievious articles have looked at fabric preparation and folding, trimming the edge and shape cutting. At last, it is time to use the sewing machine and endeavor to accurately machine piece the star.
In the previous article, the final instruction was to prepare some run-ons, and run-offs. Have them ready to use.
The first step in creating this star, is to make the star triangles and star filler triangles. Four Flying Geese units are made. Below is a Flying Geese unit.

To achieve very accurate piecing the following "quickie" method is used. Take the 4 x 1 7/8" squares and the 1 x 3 1/4" square to the ironing board. Using a very light squirt of spray starch, spray the right side of two of the small squares, and the right side of the large square. Be careful not too overdo the starch. If too much spray is used, there is a chance the fabric will shrink.
Place the small squares on diagonal corners of the 3 1/4" square as per illustration. Be precise when placing these squares. The small squares should slightly overlap in the middle, and fit exactly into the corner.
Using the iron press together the two small squares onto the large square. Notice that the spray starch actually gives body to the fabric and also holds the pieces together in such a way that there is no need to pin. Pins tend to skew when stitching on the diagonal, so the spray starch does the job.
Carefully take the unit to the sewing machine and using a very fine pen or pencil and ruler, draw a diagonal line from one small square to the other as the illustration below demonstrates.
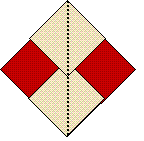
Take the unit to the machine and place a run-on under the needle and stitch to the end of the run-on. Gently place the unit under the needle and sew a 1/4" away from the drawn line. To do this, place the edge of the 1/4" foot on the drawn line. Sew right across the diagonal, over the second square to the other corner. When sewing is complete, before cutting the thread, place a run-off under the needle and sew to the end, in readiness for the next stitching. Cut the thread, and cut the run-on away.
Turn the unit around and stitch the same way on the other side of the drawn line, again placing the 1/4" foot on the line. Don't forget to sew into a run-off after the unit sewing is complete, in readiness for the next stitching.
Rotary cut on the line and take the two units to the ironing board.
The units should look like the top diagram before you iron
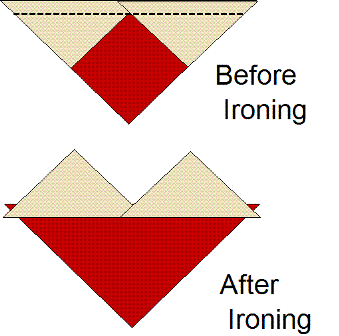
One of the most useful hints I know of when pressing is to "set the seams" first. It is a old tailors trick and it works even on fine cotton. Press both sides of each unit, on the stitched line. The heat from the iron embeds the thread into the fabric and makes for a neater more accurate pressed seam. Once the seams have been set, press the small triangles away from the large triangle. The units should look like the bottom diagram after ironing.
Take the remaining two small squares, and very lightly spray the right side of the two small squares, and the right side of the two units. Place one square on the corner of each of the large triangles and press to keep them firmly together.
Draw a diagonal line down the middle of the small square on both units as illustrated below
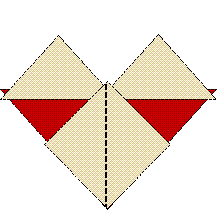
Place one of the units under the needle. Using a run-on first, sew a 1/4" from the drawn line. To do this, place the edge of the 1/4" foot on the drawn line. Do the same with the second unit. Use a run-off. Cut the thread, and cut the run-on away from the two units. Turn the units around and sew another seam 1/4" away from the drawn line. Do the same with the second unit. Use a run-off on completion.
Rotary cut on the drawn line of the two units and take them to the ironing board.
Set the seams first, then carefully using the point of the iron press the small triangles away from the large triangle. Cut the nubs off each of the units. Each unit has three nubs. These are the pointy bits that stick out. If these do not get trimmed before being pieced into a star, the bulk will distort the star and the unit will not sit flat.
Four flying geese units have been created. Congratulations!
The next and final article will offer the final instructions for piecing the rows together.
Just a reminder - if you have any queries regarding these instructions, contact me via the forum, so others quilters can see your question and my answer.
Here is the link: https://forums.bellaonline.com/ubbthreads.php?ubb=showflat&Number=406248#Post406248
In the previous article, the final instruction was to prepare some run-ons, and run-offs. Have them ready to use.
The first step in creating this star, is to make the star triangles and star filler triangles. Four Flying Geese units are made. Below is a Flying Geese unit.

To achieve very accurate piecing the following "quickie" method is used. Take the 4 x 1 7/8" squares and the 1 x 3 1/4" square to the ironing board. Using a very light squirt of spray starch, spray the right side of two of the small squares, and the right side of the large square. Be careful not too overdo the starch. If too much spray is used, there is a chance the fabric will shrink.
Place the small squares on diagonal corners of the 3 1/4" square as per illustration. Be precise when placing these squares. The small squares should slightly overlap in the middle, and fit exactly into the corner.
Using the iron press together the two small squares onto the large square. Notice that the spray starch actually gives body to the fabric and also holds the pieces together in such a way that there is no need to pin. Pins tend to skew when stitching on the diagonal, so the spray starch does the job.
Carefully take the unit to the sewing machine and using a very fine pen or pencil and ruler, draw a diagonal line from one small square to the other as the illustration below demonstrates.

Take the unit to the machine and place a run-on under the needle and stitch to the end of the run-on. Gently place the unit under the needle and sew a 1/4" away from the drawn line. To do this, place the edge of the 1/4" foot on the drawn line. Sew right across the diagonal, over the second square to the other corner. When sewing is complete, before cutting the thread, place a run-off under the needle and sew to the end, in readiness for the next stitching. Cut the thread, and cut the run-on away.
Turn the unit around and stitch the same way on the other side of the drawn line, again placing the 1/4" foot on the line. Don't forget to sew into a run-off after the unit sewing is complete, in readiness for the next stitching.
Rotary cut on the line and take the two units to the ironing board.
The units should look like the top diagram before you iron

One of the most useful hints I know of when pressing is to "set the seams" first. It is a old tailors trick and it works even on fine cotton. Press both sides of each unit, on the stitched line. The heat from the iron embeds the thread into the fabric and makes for a neater more accurate pressed seam. Once the seams have been set, press the small triangles away from the large triangle. The units should look like the bottom diagram after ironing.
Take the remaining two small squares, and very lightly spray the right side of the two small squares, and the right side of the two units. Place one square on the corner of each of the large triangles and press to keep them firmly together.
Draw a diagonal line down the middle of the small square on both units as illustrated below

Place one of the units under the needle. Using a run-on first, sew a 1/4" from the drawn line. To do this, place the edge of the 1/4" foot on the drawn line. Do the same with the second unit. Use a run-off. Cut the thread, and cut the run-on away from the two units. Turn the units around and sew another seam 1/4" away from the drawn line. Do the same with the second unit. Use a run-off on completion.
Rotary cut on the drawn line of the two units and take them to the ironing board.
Set the seams first, then carefully using the point of the iron press the small triangles away from the large triangle. Cut the nubs off each of the units. Each unit has three nubs. These are the pointy bits that stick out. If these do not get trimmed before being pieced into a star, the bulk will distort the star and the unit will not sit flat.
Four flying geese units have been created. Congratulations!
The next and final article will offer the final instructions for piecing the rows together.
Just a reminder - if you have any queries regarding these instructions, contact me via the forum, so others quilters can see your question and my answer.
Here is the link: https://forums.bellaonline.com/ubbthreads.php?ubb=showflat&Number=406248#Post406248

Related Articles
Editor's Picks Articles
Top Ten Articles
Previous Features
Site Map
Content copyright © 2023 by Judie Bellingham. All rights reserved.
This content was written by Judie Bellingham. If you wish to use this content in any manner, you need written permission. Contact Judie Bellingham for details.


