Cleaning a Recycled Doll

This is the second article in this series about a recycled doll. To see the first article in the series look here:A Recycled Doll
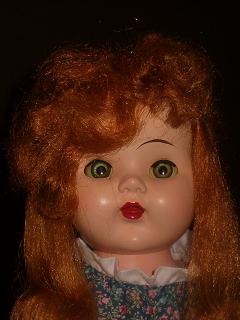
In this article I will take you step by step through the process I used for cleaning my flea market treasure. As you will see in the picture, the results were worth every penny I paid for her and every minute I spent bringing her back to beautiful.
Let me preface this by saying that I was not concerned with preserving any possible cash value that the doll might have had as a vintage doll. I wanted a doll I could enjoy and make clothes for. If you have any question about preserving the value of a vintage doll, proceed with caution and consult a restoration professional.
The first step was to gently remove her wig. The cloth lining the wig just fell apart and the wig was already coming off, so it was a simple procedure of gently lifting it off the head. I carefully reinforced the stitching and then removed the remaining fragments of cloth and set the wig aside till later.
The bath started by washing her carefully with mild dish soap and a cloth. This removed the top layer of dirt. Her entire body is made of hard plastic so all the dusty residue came off quite easily but there was a lot of grime embedded in the wrinkles and creases. Her hands and feet were still gray! And there were black scuff marks still visible.
It was time for harsher measures. Fortunately all of her painted features were still in very good condition. So I started with a clean, warm wet cloth and put a small amount of Bar Keepers Friend on the cloth and scrubbed gently, using a circular motion, and avoiding all painted on features. I'm sure any gentle cleanser would work as well. Again, let me emphasize, any cleanser will remove color and may damage the finish on the doll, so test in a small area before doing the entire doll. A little of the color of her face faded, but since I had used circular motion the faded areas blend in and there are no clearly demarcated pale spots on her face. Fortunately the hard plastic also held up well so the finish on the doll was not harmed at all. The change in her was amazing! She was actually clean and the eyeliner that was not original was gone. Even her fingers and toes were clean.
The doll was originally supposed to talk or cry because she has a series of holes on her abdomen, which I avoided with the water. When her legs "walk" she turns her head from side to side and her sleepy eyes still work. So her bath was a resounding success.
Now it was time to work on her hair. It was tied into a very frizzy braid with a rusty barrette at the bottom and 2 rusty hair pins holding her bangs back. Her hair hadn't been cut at all so I had good hair to work with. Feeling rather nervous but determined to try and save her hair, I held the hair in warm water and applied a very gentle shampoo. I kept the hair in a loose ball in my hand and just squished the shampoo gently through it. After rinsing all the shampoo out with more warm water, I applied a little bit of restorative conditioner the same way I did the shampoo and then rinsed again. I lay the hair on a thick bath towel and rolled it up to blot the water as you would with panty-hose. When most of the water was out I used a very large-toothed comb, and starting at the ends, I gently combed it out. It was soft, smelled fresh and looked great. In the next article I will give her measurements and start talking about making her clothes.
Making and Dressing Cloth Dolls
Ebook with patterns and instructions to make 5 cloth dolls as well as chapters on general doll making techniques.The book includes 21 inch Lalena Doll, 21 inch David Doll, Bear Dolls, 9 inch Destiny Doll and 15 inch Annie Doll, all together in one handy book. 53 pages.Making and Dressing Cloth Dolls.
You Should Also Read:
Care and Cleaning of Dolls and Doll Clothes
Cloth and Fabric Dolls
Doll Costumes and Clothing

Related Articles
Editor's Picks Articles
Top Ten Articles
Previous Features
Site Map
Content copyright © 2023 by Helen B. Wharton. All rights reserved.
This content was written by Helen B. Wharton. If you wish to use this content in any manner, you need written permission. Contact Helen B. Wharton for details.


