Fabric preparation for Accurate Piecing

Fabric preparation in readiness for accurate cutting
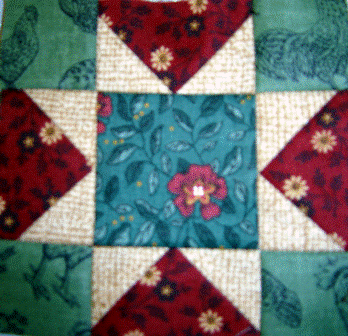
 | This is the 4 inch star block that we're going to create |
Accurate Rotary Cutting
Understanding and determining the straight of grain in your fabric, in readiness for accurate cutting
I am often asked how I go about being accurate in my machine piecing and so I’ve put together a series of tutorials on Accuracy in Machine Piecing. This first tutorial will concentrate on accurately preparing the fabrics required to create the unfinished star block. These are the star blocks I’m currently making for my feathered star quilt. To be accurate with machine piecing the quilter needs to take notice of every step along the way. Improved accuracy can be assured when concentrating on each and every moment of creation. The first step is preparing the fabric ready for cutting accurately.
Here is a photo of the star block that we’ll be making. It’s quite simple, although I do like to use a “quickie” method for the flying geese units. That will be explained as we go along.
Firstly, here’s a list of the fabrics you’ll need.
Four different coloured fabrics –
1 x light coloured (eg beige)
1 x medium coloured (eg rust)
1 x medium dark coloured (eg navy blue)
1 x dark colored (eg burgundy)
You will need approx 10” x 10” squares of each fabric
Preparing the fabric.
I don’t wash fabric prior to sewing – I like the dressing that is in the fabric, it helps to stabilize as I’m sewing. I also like to use spray starch. Just a very light spray over the surface is all that’s needed. The spray starch gets rid of any creases and gives a crispness that is easy to cut through. I also use spray starch to hold pieces of fabric together. This allows me to avoid using pins most of the time, and thus avoid skewing the fabric with pins.
One of the rules of thumb when cutting with our rotary cutters, rulers and mats, is that we firstly cut strips, and then from those strips we cut shapes – they may be squares, triangles, rectangles, and diamonds and so on.
Fabric preparation is essential to accurate cutting. By preparation I’m talking about (a) finding the straight of grain of the fabric and (b) folding the fabric into four layers to cut the strips, and finally (c) cutting strips and individual pieces.
One of the questions I get asked often is “how do you avoid the dog-legs in a strip cut piece of fabric”.
After much experimentation I’ve found that it is important to get rid of any folds or creases in the fabric, as quilters tend to assume that the fabric is folded on the straight of grain of the fabric when indeed it is not, and this false assumption is one of the main causes of dog-leg syndrome!
So let’s get to (a) finding the straight of grain of fabric. There are three types of grain found in fabric. Lengthwise grain, crosswise grain, bias grain.
Lengthwise grain refers to the threads in fabric which run the length of the fabric, and are parallel to the selvedge of the fabric.
Crosswise grain refers to the threads that run perpendicular to the selvedge of the fabric or the cut edge of the fabric as it comes off the bolt.
Bias grain refers to the thread line that is at a right angle to the lengthwise and crosswise grain of the fabric as it is on the bolt. The bias has stretch in woven fabric.
It is important to use the straight of grain for a number of reasons. Firstly, cutting edges on the straight of grain can reduce stretching during measuring, marking, cutting and sewing. Also, cutting triangles will always end up with at least one bias edge. You can piece this bias edge against a straight edge and again, minimize the chances of stretching and skewing.
If the fabric you are using has had the selvedges cut off there is a very reliable test to determine the straight of grain. Hold the fabric between thumb and fingers about 4” from the selvedge edge. Gently pull the fabric apart and make a mental note of how stretchy it is. Now, turn to the side edge and do the same. Make a mental note of how stretchy it is. The least stretchy edge is the edge where the selvedge was and is the straight of grain.
See https://quilting.about.com/od/fabricembellishment/ss/fabric_grain_4.htm for a visual description for testing the straight of grain on fabric that doesn’t have its selvedges.
Next time we’ll be looking at (b) Folding your fabric and (c) cutting strips and individual pieces.
Do you have any comments about this article, or would you like to ask me a question? Go to the Forum Here's the link - https://forums.bellaonline.com/ubbthreads.php?ubb=showflat&Number=406248#Post406248 and ask away, I'm at your service!
Testing for Straight Grain of Fabrics

Related Articles
Editor's Picks Articles
Top Ten Articles
Previous Features
Site Map
Content copyright © 2023 by Judie Bellingham. All rights reserved.
This content was written by Judie Bellingham. If you wish to use this content in any manner, you need written permission. Contact Judie Bellingham for details.


