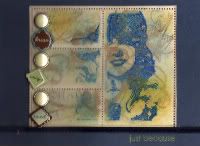
Masking Challenge

I have used a store bought, laser cut mask that coordinates with my rubber stamp, but if you feel like making your own mask you can use masking tape.
If you chose to use masking tape you have greater flexibility in what you mask. You can create interesting lines in the way that you “rip” the tape. You do not have to place the tape directly over the stamped image. You can be asymmetrical. Ah, the choices! On the other hand, a template will always speed you up, and you can reuse it again and again.
Materials
Blocked rubber stamp- I used one from www.jffstamps.com, faux postage
3 X 5 white paper
Plastic masking template- I used one from www.jffstamps.com, faux postage templates
Ink pads- I used Staz On Black for the blocked areas, dye ink blue and gold for the swirl and face images.
Stippling Brush
Two rubber stamps that will look good together, either layered or because their content complements each other. I used a g series swirl stamp for the background, and stampfransisco face stamp for the second image
If you want, you can use one rubber stamp with a word or phrase (Happy Birthday, Happy Anniversary, etc.)
One 4 X 6 blank card
Adhesive
Directions
Use fast drying black in to stamp the 3 x 5 paper with a blocked rubber stamp.
Mask over the stamped line. Using a template is the easiest way to proceed. If you don’t have one you can make your own. You can cut masking tape with thin lines to cover your stamped image.
Take a stippling brush and rub it over a colored inkpad. I used a light blue. You can now lightly stipple the blocked areas. Stippling will create a soft background.
Next, stamp your images. I used gold ink and a swirl stamp and blue in for a face image. You could try a background and image as I did, or try two similar images such as two flowers overlapping each other.
Now is the time to stamp a word or sentiment somewhere over the images. You will have to judge where it will look best. I chose not to add one to this image.

I am very pleased with the look of this card. Using the stamp and template it took me less than ten minutes to make. I varied colors and images on other cards, and no one would guess it was from the same stamp.
When everything is dry, remove your mask and adhere it to the card blank. Sit back and enjoy your creation!
This site needs an editor - click to learn more!
You Should Also Read:
Masking Your Rubber Stamps
Cleaning Your Rubber Stamps
The Perfect Stamped Image
Related Articles
Editor's Picks Articles
Top Ten Articles
Previous Features
Site Map
Content copyright © 2023 by Carol Taller. All rights reserved.
This content was written by Carol Taller. If you wish to use this content in any manner, you need written permission. Contact
BellaOnline Administration
for details.


