Make a Tiny Faery Doll

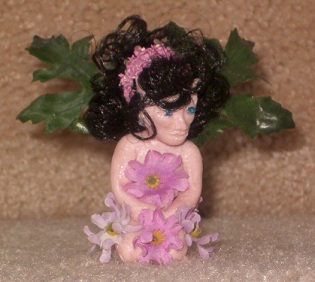
I have been fascinated, lately, by all things Faery, or Fairy, as you may know them better. Along with this fascination my fingers have been itching to try making one myself. So here is the result of my first attempt. She is a Flower Faery, and I'm very pleased with her.
I used polymer clay to make her body and it was a lot of fun. Don't be afraid to try this, believe me, I'm not a sculptor; but this was easy to do. There is a ton of information online about how to work with polymer clay and many good books on the subject. I have previously reviewed a wonderful book about making dolls out of polymer clay, Creating Likelike Figures in Polymer Clay.
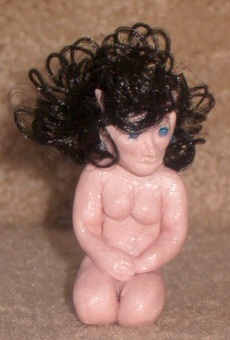
The clay I used was Sculpey, in Pink Pearl color. I particularly like this color for Faeries because it has a little sparkle to it after it is cured, as you can see in the photo at right. A 2 0z. package is enough to make 4 dolls like mine. The clay has lines scored into it, dividing it into 4 sections, I used 1 section.
The first step is to condition the clay. This is simply kneading it in your hands until it is soft, smooth and pliable. Once the clay was ready I pulled off a piece large enough to form the head, about .5 inch in diameter. I then rolled it out, with just my fingers, to a rectangle about 1.5 to 2 inches long by about an inch wide, and about .25 inch thick. From this rectangle I cut up from the bottom to about half way up and separated the two sections, but did not pull them off. These became the legs. I then cut up, from the middle, about 1/4 of the way in on each side to about 1/4 inch from the top. These became the arms. I just started shaping the arms, legs and body while keeping the arms and legs attached. I can't tell you exactly how I did this, I just played with it. If you are completely at a loss as to how to shape this, refer to the book mentioned above, or check for tutorials online. Again, I am not a sculptor, I just had fun with it, mine isn't perfect; the face is certainly not pretty, but it doesn't have to be!
When I was happy with the body I started work on the head. To shape the features of the face I used an old, metal nail file with a point on one end, but any clay sculpting tool, or even a tooth pick would work. Then I attached it to the body and added 2 little pointy ears. If you aren't happy with you figure, mash it up, knead it in your fingers and start again.
When you have a finished figure you are happy with the clay needs to be cured. The package of clay will have directions for what temperature to bake it at to cure it. The directions on mu package said to bake it at 135 degrees for 15 minutes per 1/4 inch of thickness. Since my figure was not uniformly 1/4 inch thick; and since i have previously had some thin pieces turn brown in the oven; I decided to try curing it with my blow dryer. This worked well for me because i could control how much heat the thin parts, like the ears, got. Try it and see how you like it. My figure is not cured to optimal hardness, but since I am aware of this and can be careful with how roughly I handle it, it works for me.
Once my faery was cured, I added tiny drops of hot glue that had blue glitter in it for her eyes and earrings. I then added a tiny amount of black, curly doll hair, also with hot glue.
To make wings and clothes for her I used one stem of silk flowers. Two leaves became her wings and some individual flowers became her clothes. These I also hot glued in place. Now she is complete and I love her.
The most popular dress on the Doll Making Site, The Spring Dress for 18 Inch Dolls, is included as well as 5 other outfits, underwear, and accessories such as jewelry, a bag, a knitted hat and scarf, and the new scrub suit. There are also patterns for slender Magic Attic type dolls as well as full-bodied American Girl dolls and an antique Saucy Walker doll from the 1950's.
If you love 18 inch dolls, and want a collection of patterns for a wardrobe, all in one handy Ebook, this is for you! All these patterns are available on the Doll Making site, but I have brought them all together in one book for ease of finding and using them. Make Clothes for 18 Inch Dolls.
I used polymer clay to make her body and it was a lot of fun. Don't be afraid to try this, believe me, I'm not a sculptor; but this was easy to do. There is a ton of information online about how to work with polymer clay and many good books on the subject. I have previously reviewed a wonderful book about making dolls out of polymer clay, Creating Likelike Figures in Polymer Clay.
The clay I used was Sculpey, in Pink Pearl color.
The first step is to condition the clay. This is simply kneading it in your hands until it is soft, smooth and pliable. Once the clay was ready I pulled off a piece large enough to form the head, about .5 inch in diameter. I then rolled it out, with just my fingers, to a rectangle about 1.5 to 2 inches long by about an inch wide, and about .25 inch thick. From this rectangle I cut up from the bottom to about half way up and separated the two sections, but did not pull them off. These became the legs. I then cut up, from the middle, about 1/4 of the way in on each side to about 1/4 inch from the top. These became the arms. I just started shaping the arms, legs and body while keeping the arms and legs attached. I can't tell you exactly how I did this, I just played with it. If you are completely at a loss as to how to shape this, refer to the book mentioned above, or check for tutorials online. Again, I am not a sculptor, I just had fun with it, mine isn't perfect; the face is certainly not pretty, but it doesn't have to be!
When I was happy with the body I started work on the head. To shape the features of the face I used an old, metal nail file with a point on one end, but any clay sculpting tool, or even a tooth pick would work. Then I attached it to the body and added 2 little pointy ears. If you aren't happy with you figure, mash it up, knead it in your fingers and start again.
When you have a finished figure you are happy with the clay needs to be cured. The package of clay will have directions for what temperature to bake it at to cure it. The directions on mu package said to bake it at 135 degrees for 15 minutes per 1/4 inch of thickness. Since my figure was not uniformly 1/4 inch thick; and since i have previously had some thin pieces turn brown in the oven; I decided to try curing it with my blow dryer. This worked well for me because i could control how much heat the thin parts, like the ears, got.
Once my faery was cured, I added tiny drops of hot glue that had blue glitter in it for her eyes and earrings. I then added a tiny amount of black, curly doll hair, also with hot glue.
To make wings and clothes for her I used one stem of silk flowers. Two leaves became her wings and some individual flowers became her clothes. These I also hot glued in place. Now she is complete and I love her.
The most popular dress on the Doll Making Site, The Spring Dress for 18 Inch Dolls, is included as well as 5 other outfits, underwear, and accessories such as jewelry, a bag, a knitted hat and scarf, and the new scrub suit. There are also patterns for slender Magic Attic type dolls as well as full-bodied American Girl dolls and an antique Saucy Walker doll from the 1950's.
If you love 18 inch dolls, and want a collection of patterns for a wardrobe, all in one handy Ebook, this is for you! All these patterns are available on the Doll Making site, but I have brought them all together in one book for ease of finding and using them. Make Clothes for 18 Inch Dolls.

Related Articles
Editor's Picks Articles
Top Ten Articles
Previous Features
Site Map
Content copyright © 2023 by Helen B. Wharton. All rights reserved.
This content was written by Helen B. Wharton. If you wish to use this content in any manner, you need written permission. Contact Helen B. Wharton for details.


