Bonnet and Apron for 21 inch Lalena Doll

To make the bonnet and apron you will need about 1/4 yard of plain white or eyelet fabric, or fabric of your choice to coordinate with your doll's dress. This pattern is free for your personal use but you may not use it commercially.
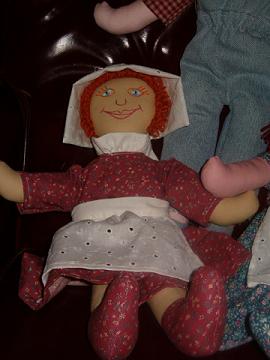
Here is a picture of the apron and bonnet on Lalena.
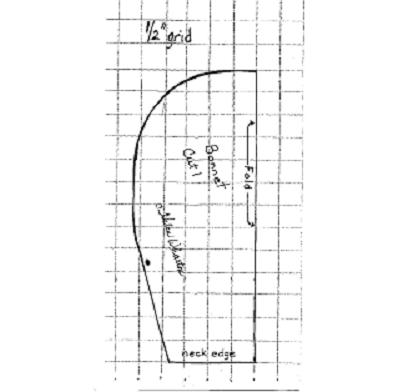
For the bonnet cut one rectangle 6 inches by 11 1/2 inches for the brim and one of the pattern piece given below. Cut two rectangles 8 1/2 inches by 1 1/2 inches for the ties.The pattern piece is on a 1/2 inch grid and 1/4 inch seam allowance is included in all pieces.
Begin by folding the brim, right sides together, in half the long way and sew together the 2 ends. Clip the closed corners and turn right side out. Hem the neck edge of the bonnet by folding the neck edge to the wrong side 1/8 inch, twice, and stitch.
Using a, long basting stitch, sew around the long curve of the bonnet, between the dots, and gather. Pin the bonnet to the two layers of the brim, on the not sewn side of the brim, right sides together. Ease the bonnet to fit the length of the brim. Sew them together.
To make the ties, fold the fabric in half the long way, right sides together and stitch one short end and the long side closed, leaving one short end open to turn. Turn right side out and press flat. Attach the ties to the bottom of the bonnet, just behind the seam where the brim joins the bonnet. The ties can be optional, but if you choose not to use them I would recommend tacking the bonnet to the doll's head so it doesn't fall off and get misplaced.
For the apron cut two rectangles. Make one 6 1/2 inches by 11 inches for the apron and one 22 inches by 2 inches for the waistband and tie. Start by hemming around 3 sides of the apron. Fold under the 2 short sides and 1 long side 1/4 inch, twice, to the wrong side and stitch. Using a long basting stitch gather the side not hemmed to measure 6 inches long. Fold the waistband in half the long way, right sides together. Sew the short ends, clip the inside corners and turn right side out. Fold the long, unstitched sides to the wrong side 1/4 inch and press. Center the gathered edge of the apron inside the open side of the waistband, making sure basting stitches are hidden inside the waistband. Pin and top stitch entire open side of the waistband as close to the folded edges as possible. Be sure both folded edges are sewn through, as well as the body of the apron
You now have a complete prairie style outfit for your 21 inch cloth Lalena doll.
Making and Dressing Cloth Dolls
Ebook with patterns and instructions to make 5 cloth dolls as well as chapters on general doll making techniques.The book includes 21 inch Lalena Doll, 21 inch David Doll, Bear Dolls, 9 inch Destiny Doll and 15 inch Annie Doll, all together in one handy book. 53 pages.Making and Dressing Cloth Dolls.
Here is a picture of the apron and bonnet on Lalena.
For the bonnet cut one rectangle 6 inches by 11 1/2 inches for the brim and one of the pattern piece given below. Cut two rectangles 8 1/2 inches by 1 1/2 inches for the ties.The pattern piece is on a 1/2 inch grid and 1/4 inch seam allowance is included in all pieces.
Begin by folding the brim, right sides together, in half the long way and sew together the 2 ends. Clip the closed corners and turn right side out. Hem the neck edge of the bonnet by folding the neck edge to the wrong side 1/8 inch, twice, and stitch.
Using a, long basting stitch, sew around the long curve of the bonnet, between the dots, and gather. Pin the bonnet to the two layers of the brim, on the not sewn side of the brim, right sides together. Ease the bonnet to fit the length of the brim. Sew them together.
To make the ties, fold the fabric in half the long way, right sides together and stitch one short end and the long side closed, leaving one short end open to turn. Turn right side out and press flat. Attach the ties to the bottom of the bonnet, just behind the seam where the brim joins the bonnet. The ties can be optional, but if you choose not to use them I would recommend tacking the bonnet to the doll's head so it doesn't fall off and get misplaced.
For the apron cut two rectangles. Make one 6 1/2 inches by 11 inches for the apron and one 22 inches by 2 inches for the waistband and tie. Start by hemming around 3 sides of the apron. Fold under the 2 short sides and 1 long side 1/4 inch, twice, to the wrong side and stitch. Using a long basting stitch gather the side not hemmed to measure 6 inches long. Fold the waistband in half the long way, right sides together. Sew the short ends, clip the inside corners and turn right side out. Fold the long, unstitched sides to the wrong side 1/4 inch and press. Center the gathered edge of the apron inside the open side of the waistband, making sure basting stitches are hidden inside the waistband. Pin and top stitch entire open side of the waistband as close to the folded edges as possible. Be sure both folded edges are sewn through, as well as the body of the apron
You now have a complete prairie style outfit for your 21 inch cloth Lalena doll.
 |
Making and Dressing Cloth Dolls
Ebook with patterns and instructions to make 5 cloth dolls as well as chapters on general doll making techniques.The book includes 21 inch Lalena Doll, 21 inch David Doll, Bear Dolls, 9 inch Destiny Doll and 15 inch Annie Doll, all together in one handy book. 53 pages.Making and Dressing Cloth Dolls.
You Should Also Read:
21 inch Lalena Doll
21 inch Lalena Doll Dress Pattern

Related Articles
Editor's Picks Articles
Top Ten Articles
Previous Features
Site Map
Content copyright © 2023 by Helen B. Wharton. All rights reserved.
This content was written by Helen B. Wharton. If you wish to use this content in any manner, you need written permission. Contact Helen B. Wharton for details.


