An Altered Jewelry Box

Here's a fun project I just finished.
It's an altered jewelry box that I made to store my handmade jewelry.

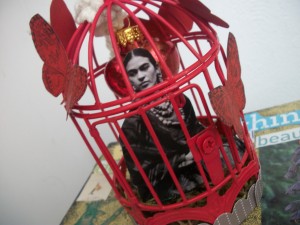
That's a view from the top. Frida is in the miniature birdcage, with a heart behind her.

 Making a box like this is easy.
I started with a plain cardboard box, from Michaels. I spent $2.99 on it. If you're anything like me, you've got folders with clippings from magazines, and things like that.
The first thing I did was add color to the box. You can do that several ways. I made my own alcohol ink, by mixing RIT dye with Isopropyl Alcohol (although in a pinch, you could probably just use hairspray).
With a spray bottle, spray the color onto the box, and brush it on with a paint brush. I used a shade of teal and a shade of read for an interesting dark color.
After that, I used my clear embossing ink pad, and rubbed it the box, and went over it with gold glittery embossing powder.
Then of course, give your embossing/heat gun a good work out embossing that box.
After that, you can collage some clippings from magazines, words, buttons, keys, whatever!
On the top and around the sides, you'll see a rubber stamped bird, from my own collection of rubber stamps. That dude is called "The Trumpet King" but I cut the trumpet out.
I also used a rubber stamp by 100 Proof press, for my butterflies.
For the centerpiece, I used a mini birdcage from Michaels. You could get some air dry crayola clay, and twist it to form a cupcake, and put inside of a cupcake liner if you want, and make that your centerpiece. Or maybe an antique doll, or some pretty fiber flowers, or something. Whatever! Use your glue gun to adhere it, or use good old E-6000 glue. I swear, I use that stuff so much, you'd think I worked for them!
Anyway, that's that.
I hope you enjoyed my little tutorial!
Diana "The Craftaholic"
www.thecraftaholic.com
It's an altered jewelry box that I made to store my handmade jewelry.

That's a view from the top. Frida is in the miniature birdcage, with a heart behind her.

 Making a box like this is easy.
 I started with a plain cardboard box, from Michaels. I spent $2.99 on it. If you're anything like me, you've got folders with clippings from magazines, and things like that.
The first thing I did was add color to the box. You can do that several ways. I made my own alcohol ink, by mixing RIT dye with Isopropyl Alcohol (although in a pinch, you could probably just use hairspray).
With a spray bottle, spray the color onto the box, and brush it on with a paint brush. I used a shade of teal and a shade of read for an interesting dark color.
After that, I used my clear embossing ink pad, and rubbed it the box, and went over it with gold glittery embossing powder.
Then of course, give your embossing/heat gun a good work out embossing that box.
After that, you can collage some clippings from magazines, words, buttons, keys, whatever!
On the top and around the sides, you'll see a rubber stamped bird, from my own collection of rubber stamps. That dude is called "The Trumpet King" but I cut the trumpet out.
I also used a rubber stamp by 100 Proof press, for my butterflies.
For the centerpiece, I used a mini birdcage from Michaels. You could get some air dry crayola clay, and twist it to form a cupcake, and put inside of a cupcake liner if you want, and make that your centerpiece. Or maybe an antique doll, or some pretty fiber flowers, or something. Whatever! Use your glue gun to adhere it, or use good old E-6000 glue. I swear, I use that stuff so much, you'd think I worked for them!
Anyway, that's that.
I hope you enjoyed my little tutorial!
Diana "The Craftaholic"
www.thecraftaholic.com
This site needs an editor - click to learn more!
| Rubber Stamping Forum Posts |
| crackle medium |
| 30 Cards in 30 Days Challenge |
| What are Your Valentine's Day Projects? |

Related Articles
Editor's Picks Articles
Top Ten Articles
Previous Features
Site Map
Content copyright © 2023 by Diana Gonzalez. All rights reserved.
This content was written by Diana Gonzalez. If you wish to use this content in any manner, you need written permission. Contact BellaOnline Administration for details.


