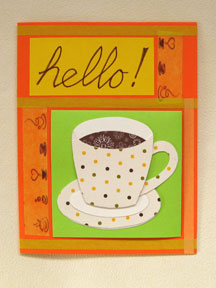
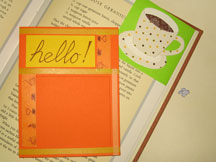
Envelope Bookmark Card

 The cut-off corner of a used envelope makes a great bookmark, as it readily slips over the corner of a book page. Decorating the envelope bookmark is also great fun, and as long as you keep the embellishments relatively flat, the possibilities are endless.
In his book "Cards that Pop Up, Slip & Slide" (2005, North Light Books), artist Michael Jacobs takes the envelope bookmark a step further and shows how you can make it part of a greeting card. Here’s our take on his bookmark card.
You will need:
* Cup and Saucer template (Use this or make your own)
* Colored envelope
* Colored cardstock, one letter-size sheet (for card)
* Patterned paper (for cup and saucer)
* Scraps of white cardstock (for cup and saucer)
* Scrap of brown cardstock (for coffee)
* Scrap of paper about 1-3/8 by 2-7/8 inches (for sentiment)
* Brown marker
* Washi tape or deco tape
* Pencil
* Scissors
* Craft glue
* Craft knife
* Cutting mat
* Ruler or straightedge
* Bone folder
 Let’s start with the bookmark. Cut a 3-inch square from the bottom corner of an envelope. Put the envelope corner on your work surface with its back facing up, and its folded edges on the top and left. Cut the back of the envelope diagonally from the upper right corner to the lower left corner, leaving the front of the envelope intact. Set this aside.
Make the coffee cup next; this will be attached to the front of the envelope corner. Using the template as a guide, trace and cut the various parts from cardstock and patterned paper as indicated. Align the bottoms of Cup1 and Cup2 and glue them together. Glue Cup3 on top of them. Trim off any unsightly excess paper. Set aside.
Align the tops of Saucer1 and Saucer2 and glue together, leaving a thin crescent border at the bottom of the saucer. Center Saucer3 onto Saucer2 and glue together.
Now glue the cup to the saucer, using the photo as a guide. Arrange the cup and saucer plus the handle on the envelope corner, and glue them into place. Set aside.
Score and fold the letter-size cardstock into quarters, making a side-folded card. Lay the bookmark on the front panel and mark its final position by tracing its top and right edges with a pencil. Unfold the card, and use a craft knife to cut the right angle formed by the traced lines. Re-fold the card and slip the bookmark over the flap.
Continue decorating the front of the card. Use a brown marker to write “hello!” onto the 1-3/8 by 2-7/8 inch paper and glue this above the bookmark. Fill the spaces with lengths of washi tape as desired, trimming off any excess tape.
You Should Also Read:
Magnetic Bookmark Project
Irish Bookmarks
Washi Tape Cards

Related Articles
Editor's Picks Articles
Top Ten Articles
Previous Features
Site Map
Content copyright © 2023 by Mia C. Goloy. All rights reserved.
This content was written by Mia C. Goloy. If you wish to use this content in any manner, you need written permission. Contact Mia C. Goloy for details.


