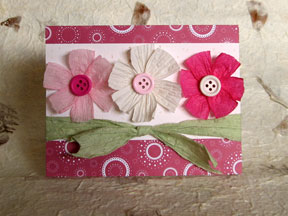
Paper Cord Floral Card for Mother’s Day

 This card was designed with Mother’s Day in mind, but it’s perfect for other occasions too. Using paper cord – sometimes called paper yarn or paper twine – gives the card a light, carefree look; paired with wood buttons, the effect becomes even folksier.
You will need:
* Cream cardstock, 5-1/2 by 4-1/4 inches
* Paper cord
– Light green, 10 inches
– White, 6 inches
– Light pink, 6 inches
– Dark pink, 6 inches
* Patterned paper, rose or raspberry color, 5-1/2 by ½ inch and 5-1/2 by 1 inch
* Three buttons: white, light pink and dark pink
* Three cream cardstock circles the size of the buttons
* Household glue like Duco Cement, or hot glue gun
* Glue stick
* Pencil
* Ruler
* Craft knife and cutting mat, or paper trimmer
* Scissors
* Bone folder (optional)
Mark, measure and cut the cream cardstock to the specified size. Score and fold it in half crosswise to form a top-folded card.
Mark, measure and cut the patterned paper into the specified sizes. With a glue stick, attach the narrow strip at the top of the card, and the wider strip at the bottom.
Take the green paper cord and untwist it, then smooth it out with your fingers. Cut the paper in two, and tie the ends into a bow using a square knot. Trim the ends of the bow, and then glue the bow to the card. You may with trim off the excess paper, or tuck and glue it behind the front panel.
Now to make the flowers. On scraps of cream cardstock, trace three circles using one of the buttons as a template. Cut out the circles and set aside.
Cut the white paper cord into three pieces, each measuring two inches in length. Untwist the paper and smooth it out. Take one piece and give it a twist in the middle to get a bow or hour-glass shape; do the same with the two other pieces. Using the household glue, attach a bow-shaped piece to the center of a cardstock circle. Glue the next bow-shaped piece on top of the first one, and glue the third one top of the second, spacing the pieces in such a way that they form a flower. Attach a button to the center of the flower using the household glue; allow to dry. Make the two pink flowers in the same manner.
When the flowers are dry, attach them to the card using household glue, and let them dry completely. Your card is now ready to be signed, sealed and delivered!

Related Articles
Editor's Picks Articles
Top Ten Articles
Previous Features
Site Map
Content copyright © 2023 by Mia C. Goloy. All rights reserved.
This content was written by Mia C. Goloy. If you wish to use this content in any manner, you need written permission. Contact Mia C. Goloy for details.


