
Seashell Matchbox Shrine
In many cultures, a shrine is used to commemorate an event, honor a person, or keep an object of significance. A matchbox shrine - made from an ordinary box of matches, hence the name - is not much different. Let's make a matchbox shrine to showcase a small memento, like a seashell from a memorable trip to the beach.
Here's what you need:
* Empty match box
* Small seashell
* Pinch or two of sand
* 2 pieces of decorative paper, each measuring 6 by 3 inches
* 1 piece of plain paper in a coordinating color (aqua, in our example) measuring 6 by 4 inches
* 2 pieces of plain paper in a complementary color (neon salmon in our example), each measuing 1-1/2 inches square
* 12-inch length of narrow satin ribbon
* Pen and small scrap of paper
* Scissors
* Clear-drying craft glue
* Dimensional glaze (optional)
* Double sided tape (optional)
* Small piece of double sided foam tape
Remove the box from the case. Cover the inside and the sides of the box with plain paper and glue. There is no need to cover the underside of the box since you will glue this to the case later. Set aside.
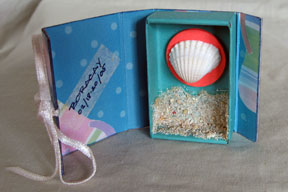
Cut the front edge of the case to make a door. Alternatively you can carefully separate the tabs which join the case together, as in our example. The hinge should be on the left side of the box, and the opening on the right.
Cover both sides of the case with decorative paper, and trim the excess. Score along the original lines of the case and fold. Punch a hole near the right edge of the door and thread the ribbon through it. On a small scrap of paper, write the name of the beach and the date you were there. Stick this to the inside of the door.
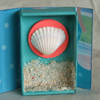
Decorate the inside of the box. Cut or punch two 1-inch circles from the neon salmon paper. Glue one circle to the inside of the box. Glue the shell to the other circle, and using double-sided foam tape, glue this circle to the circle in the box.
Spread some white glue or dimensional glaze on the inside of the box, below the circle. Cover the glue with sand, pressing down on the sand to make it stick, and then shake off the excess. When dry, line the edge of the sand with dimensional glaze to simulate water (you can also skip this step).
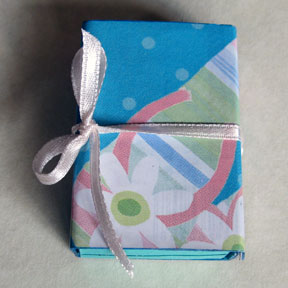
Stick the box to the case with glue or double-sided tape. Tie the ribbon to close the shrine. You can further decorate the outside of the shrine with buttons, beads, or a tassel - it's all up to you. Have fun!
Here's what you need:
* Empty match box
* Small seashell
* Pinch or two of sand
* 2 pieces of decorative paper, each measuring 6 by 3 inches
* 1 piece of plain paper in a coordinating color (aqua, in our example) measuring 6 by 4 inches
* 2 pieces of plain paper in a complementary color (neon salmon in our example), each measuing 1-1/2 inches square
* 12-inch length of narrow satin ribbon
* Pen and small scrap of paper
* Scissors
* Clear-drying craft glue
* Dimensional glaze (optional)
* Double sided tape (optional)
* Small piece of double sided foam tape
Remove the box from the case. Cover the inside and the sides of the box with plain paper and glue. There is no need to cover the underside of the box since you will glue this to the case later. Set aside.
Cut the front edge of the case to make a door. Alternatively you can carefully separate the tabs which join the case together, as in our example. The hinge should be on the left side of the box, and the opening on the right.
Cover both sides of the case with decorative paper, and trim the excess. Score along the original lines of the case and fold. Punch a hole near the right edge of the door and thread the ribbon through it. On a small scrap of paper, write the name of the beach and the date you were there. Stick this to the inside of the door.
Decorate the inside of the box. Cut or punch two 1-inch circles from the neon salmon paper. Glue one circle to the inside of the box. Glue the shell to the other circle, and using double-sided foam tape, glue this circle to the circle in the box.
Spread some white glue or dimensional glaze on the inside of the box, below the circle. Cover the glue with sand, pressing down on the sand to make it stick, and then shake off the excess. When dry, line the edge of the sand with dimensional glaze to simulate water (you can also skip this step).
Stick the box to the case with glue or double-sided tape. Tie the ribbon to close the shrine. You can further decorate the outside of the shrine with buttons, beads, or a tassel - it's all up to you. Have fun!

Related Articles
Editor's Picks Articles
Top Ten Articles
Previous Features
Site Map
Content copyright © 2023 by Mia C. Goloy. All rights reserved.
This content was written by Mia C. Goloy. If you wish to use this content in any manner, you need written permission. Contact Mia C. Goloy for details.

