Bias Binding made with a Bias Bar

When making bias binding with a bias bar, it is essential that the fabric strips be cut on the diagonal or bias. This means that the strips are cut at a 45° angle to the straight-of-grain or otherwise known as the selvedge edge.
Method

So, there you have it, simple instructions to make bias binding with a bias bar. The most common uses for this kind of binding are either Celtic patterns, or Stained Glass Patterns. The raised bias (caused by the seam being underneath, in the middle of the bias), gives a visual texture to the design, helping it to stand out. Particularly in the case of Celtic Designs, if you quilt about ½” around the bias pattern, the bias design will stand out even further, creating a stunning effect.
Here’s a picture of my latest Celtic design – I call this one Celtic Rhapsody. I just love the way the bias binding stands above the rest of the quilt – it looks quite dramatic I think.

Method
- Firstly, cut 1” bias strips if you’re planning to use a ¼” bias bar. Cut two or three strips for this exercise.
- Fold the strip longwise with WRONG SIDES facing. This is opposite to most quilting instructions where you place pieces right sides together. The reason the bias is folded with the wrong sides facing is because this bias IS NOT pulled through. More to that further on…
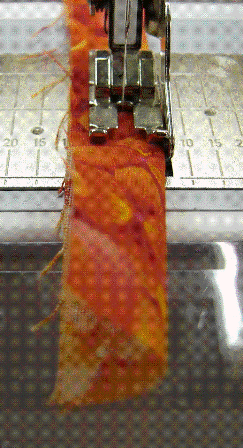
- Place the ¼” foot in position on your sewing machine and lay the folded bias strip under the needle, with the folded edge in line with the right edge of the ¼” foot.

- Sew a ¼” seam down the length of the strip. Repeat for remaining strips.
- Using a very fine pair of scissors, cut the top and bottom ends of the bias as well as the excess seam allowance, being very careful not to cut through the stitching.
- Take your bias bar and insert it into the bias “tube” and wind the seam so that it is sitting in the centre of the bias bar.
- With a hot iron, press the bias bar full length and both sides.
- Being careful not to burn yourself, remove the bias bar and re-press the strip as before. You may like to use spray starch, as this will help to stabilize the strip and keep the edges sharp and crisp.
So, there you have it, simple instructions to make bias binding with a bias bar. The most common uses for this kind of binding are either Celtic patterns, or Stained Glass Patterns. The raised bias (caused by the seam being underneath, in the middle of the bias), gives a visual texture to the design, helping it to stand out. Particularly in the case of Celtic Designs, if you quilt about ½” around the bias pattern, the bias design will stand out even further, creating a stunning effect.
Here’s a picture of my latest Celtic design – I call this one Celtic Rhapsody. I just love the way the bias binding stands above the rest of the quilt – it looks quite dramatic I think.

You Should Also Read:
Types of Bias Binding and Bias Bars

Related Articles
Editor's Picks Articles
Top Ten Articles
Previous Features
Site Map
Content copyright © 2023 by Judie Bellingham. All rights reserved.
This content was written by Judie Bellingham. If you wish to use this content in any manner, you need written permission. Contact Judie Bellingham for details.


