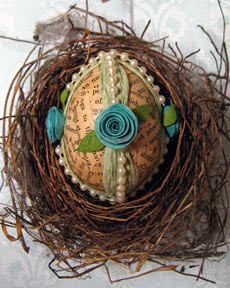
Shabby Chic Egg

In another article elsewhere on this site, we looked at making washi eggs, which are egg shapes covered with a single piece of paper. Another way to cover eggs is to collage them using several pieces of paper. In today’s project we’ll do just that: cover a plastic egg with bits of torn paper, and then decorate it further to turn it into a shabby chic egg. Perfect for Easter!

You will need:
* One egg – plastic, wood, or a real one which has been pierced, blown out, and dried
* Page from a discarded book or magazine
* Paper twine in a color of your choice
* Handmade paper in a color of your choice
* Handmade paper, green
* String of faux pearl plastic beads
* Circle template, 1-1/2 inches
* Pencil
* Scissors
* Small container
* Brush
* White glue
* Water
Tear the book page paper into half-inch wide strips, then tear the strips into triangles. In a small container mix a small amount of white glue and water. Use a brush to apply glue to one triangle, and then adhere it to one end of the egg. Smooth it down with your fingers. Glue on another triangle right next to the first, slightly overlapping the edges, and smooth it down. Repeat until the whole egg is covered with paper. Coat the entire egg with the watered down glue and set aside to dry.
Cut two pieces of paper twine, each long enough to go around the egg lengthwise. Untwist the paper twine. Take one piece and pinch the paper twine right in the middle. Glue the pinched part to the top of the egg. Pinch the twine again halfway down one end, and glue the pinched part to the side of the egg. Do this with the other end of the twine. Pinch the very ends of the paper yarn, and glue them both to the bottom of the egg.
Repeat with the second piece of paper twine.
Draw and cut four 1-1/2 inch circles from handmade paper, and make them into rosettes (instructions here).
From the green paper, cut two to three leaf shapes per rosette and glue them to the rosettes. Glue the rosettes to the paper twine. Cut short pieces of the faux pearls string and glue them on the paper twine.
You Should Also Read:
Paper Rose
How to Make a Washi Egg

Related Articles
Editor's Picks Articles
Top Ten Articles
Previous Features
Site Map
Content copyright © 2023 by Mia C. Goloy. All rights reserved.
This content was written by Mia C. Goloy. If you wish to use this content in any manner, you need written permission. Contact Mia C. Goloy for details.


