
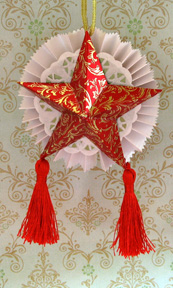
How to Make a Star Ornament

This Christmas ornament is inspired by the Philippine parol – a star-shaped lantern symbolizing the Star of Bethlehem which led the three Wise Men to the Christ Child. Traditionally, the parol is hung outside one’s home on the 16th of December, which is the start of the novena Masses or simbang gabi (evening mass), until the end of the Christmas season, the feast of the Three Kings. Now that you’ve been introduced to the parol, let’s make our ornament!
You will need (for a single-sided ornament):
* Star template (available here)
* Circle template, 2-1/2 inches in diameter (a jar lid will do)
* White text-weight paper, 8-1/2 by 11 inches
* Red metallic paper or cardstock, 6 by 6 inches
* Light green paper or cardstock, 3 by 3 inches
* Paper doily
* Two red tassels
* Gold ribbon, 1/4-inch wide and 12 inches long
* Pencil
* Straight edged scissors
* Decorative scissors
* Hole punch or awl
* Stapler and staple wire
* Craft glue
Create a fan fold flower: Cut the white paper in half lengthwise, and trim the long edges with decorative scissors. Take one of the halves and accordion-fold it starting with the short end, making each fold around ½ of an inch wide. With the paper still folded, fold it further in half crosswise to form a fan, and staple together the inner ends. Repeat with the other piece of paper. Now join the two fans together with glue or a stapler to form a circle. Set aside.
Trace a circle on the green paper or cardstock and cut it out. Cut motifs from the paper doily, and arrange them around the edge of the circle. Glue them in place. Glue the circle onto the center of the fan fold flower and set aside.
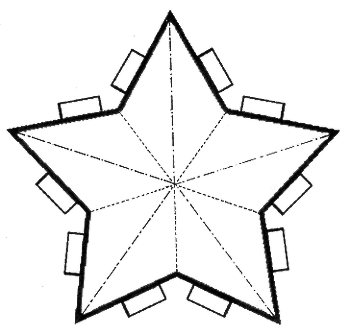
Using the template, trace and cut out the star from red metallic paper or cardstock. Fold the points on the dotted lines to give the star some form, and fold the tabs under. Apply glue to the tabs and attach the star to the fan fold flower. Let dry.
Tip: For a double-sided ornament, make another star and another doily-covered green circle and glue them to back of the ornament.
Punch a hole on the fan fold flower, at the two bottom points of the star. Thread a tassel through one hole and secure it with a knot; glue the end of the loop at the back of the fan fold flower, if needed. Repeat for the other tassel.
Punch a hole at the top of the fan fold flower and thread the gold ribbon through it. Knot the ribbon and hang up your star ornament for all to see. Maligayang Pasko! Merry Christmas!
You will need (for a single-sided ornament):
* Star template (available here)
* Circle template, 2-1/2 inches in diameter (a jar lid will do)
* White text-weight paper, 8-1/2 by 11 inches
* Red metallic paper or cardstock, 6 by 6 inches
* Light green paper or cardstock, 3 by 3 inches
* Paper doily
* Two red tassels
* Gold ribbon, 1/4-inch wide and 12 inches long
* Pencil
* Straight edged scissors
* Decorative scissors
* Hole punch or awl
* Stapler and staple wire
* Craft glue
Create a fan fold flower: Cut the white paper in half lengthwise, and trim the long edges with decorative scissors. Take one of the halves and accordion-fold it starting with the short end, making each fold around ½ of an inch wide. With the paper still folded, fold it further in half crosswise to form a fan, and staple together the inner ends. Repeat with the other piece of paper. Now join the two fans together with glue or a stapler to form a circle. Set aside.
Trace a circle on the green paper or cardstock and cut it out. Cut motifs from the paper doily, and arrange them around the edge of the circle. Glue them in place. Glue the circle onto the center of the fan fold flower and set aside.
Using the template, trace and cut out the star from red metallic paper or cardstock. Fold the points on the dotted lines to give the star some form, and fold the tabs under. Apply glue to the tabs and attach the star to the fan fold flower. Let dry.
Tip: For a double-sided ornament, make another star and another doily-covered green circle and glue them to back of the ornament.
Punch a hole on the fan fold flower, at the two bottom points of the star. Thread a tassel through one hole and secure it with a knot; glue the end of the loop at the back of the fan fold flower, if needed. Repeat for the other tassel.
Punch a hole at the top of the fan fold flower and thread the gold ribbon through it. Knot the ribbon and hang up your star ornament for all to see. Maligayang Pasko! Merry Christmas!
You Should Also Read:
Make a Fan Fold Flower
How to Make a Paper Ornament
Victorian Dove Ornament

Related Articles
Editor's Picks Articles
Top Ten Articles
Previous Features
Site Map
Content copyright © 2023 by Mia C. Goloy. All rights reserved.
This content was written by Mia C. Goloy. If you wish to use this content in any manner, you need written permission. Contact Mia C. Goloy for details.
