
Stitched Paper Yarn Embellishment

Texture adds interest and variety to paper crafts, and with today’s project we’re going to play with two kinds of textured paper: corrugated cardboard and paper yarn. These two materials go together very well, probably because they lend a casual feel to any project. Plus, they’re available in bold, bright colors, making them lots of fun to work with!
You will need: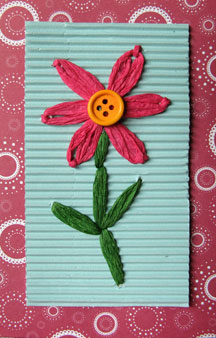
* Craft corrugated cardboard, 4.75 by 2.75 inches
* Paper yarn in a color of your choice, about 36 inches (for the flower)
* Green paper yarn, about 12 inches (for the stem and leaves)
* Button
* Wool needle (or any needle with an eye large enough for the paper yarn to go through)
* Awl
* Scissors
* Pencil
* Ruler
* Glue
* Felt for backing, 4.75 by 2.75 inches (optional)
Measure, mark, and cut the corrugated cardboard and backing felt to the specified size. Using the diagram as a guide, pierce holes (indicated by the dots) with an awl into the corrugated cardboard.
To make the flower: Untwist the paper yarn and thread it through the needle; you’ll be using a single “thread” when sewing, using the daisy stitch.
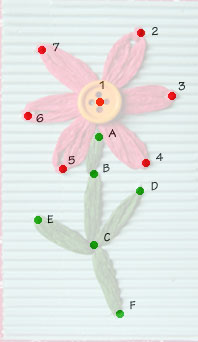 Coming from behind the cardboard, push the needle through point 1 and pull the paper yarn, leaving about an inch and a half of yarn behind the cardboard. Bring the yarn to point 2 and hold it in place. Loop the yarn and sew back into point 1. Coming from behind, sew through point 2, catch the loop of yarn and sew back into point 2 to secure the loop. The needle should now be behind the cardboard.
Repeat with the rest of the petals. When the last one is done, trim the paper yarn, leaving an inch from the end. Glue down both ends of the paper yarn. Glue a button onto the center of the flower.
To make the stem and leaves: Untwist the green paper yarn and thread it through the needle. Coming from behind the cardboard, sew through point A, again leaving about an inch and a half of yarn at the back. Sew down through point B, then up through point C. Sew down through point B again, and then up through point D. Sew down through point C, then up through point E. Sew down again through point C, then up through point F, and finally down through point C. Trim the yarn leaving about an inch at the back, then glue down the ends.
To hide the stitches behind the cardboard, adhere the felt backing to the cardboard using craft glue.
Use this embellishment on cards, scrapbook pages or journal covers, or attach it to a longer piece of cardboard and turn it into a tag. Have fun!
You will need:
* Craft corrugated cardboard, 4.75 by 2.75 inches
* Paper yarn in a color of your choice, about 36 inches (for the flower)
* Green paper yarn, about 12 inches (for the stem and leaves)
* Button
* Wool needle (or any needle with an eye large enough for the paper yarn to go through)
* Awl
* Scissors
* Pencil
* Ruler
* Glue
* Felt for backing, 4.75 by 2.75 inches (optional)
Measure, mark, and cut the corrugated cardboard and backing felt to the specified size. Using the diagram as a guide, pierce holes (indicated by the dots) with an awl into the corrugated cardboard.
To make the flower: Untwist the paper yarn and thread it through the needle; you’ll be using a single “thread” when sewing, using the daisy stitch.
Coming from behind the cardboard, push the needle through point 1 and pull the paper yarn, leaving about an inch and a half of yarn behind the cardboard. Bring the yarn to point 2 and hold it in place. Loop the yarn and sew back into point 1. Coming from behind, sew through point 2, catch the loop of yarn and sew back into point 2 to secure the loop. The needle should now be behind the cardboard. Repeat with the rest of the petals. When the last one is done, trim the paper yarn, leaving an inch from the end. Glue down both ends of the paper yarn. Glue a button onto the center of the flower.
To make the stem and leaves: Untwist the green paper yarn and thread it through the needle. Coming from behind the cardboard, sew through point A, again leaving about an inch and a half of yarn at the back. Sew down through point B, then up through point C. Sew down through point B again, and then up through point D. Sew down through point C, then up through point E. Sew down again through point C, then up through point F, and finally down through point C. Trim the yarn leaving about an inch at the back, then glue down the ends.
To hide the stitches behind the cardboard, adhere the felt backing to the cardboard using craft glue.
Use this embellishment on cards, scrapbook pages or journal covers, or attach it to a longer piece of cardboard and turn it into a tag. Have fun!
You Should Also Read:
Colorful Cupcake Tags

Related Articles
Editor's Picks Articles
Top Ten Articles
Previous Features
Site Map
Content copyright © 2023 by Mia C. Goloy. All rights reserved.
This content was written by Mia C. Goloy. If you wish to use this content in any manner, you need written permission. Contact Mia C. Goloy for details.
