
Fringed Paper Flower

With the basic quilling technique called coiling, you can make fringed flowers out of paper strips. It's best to use quilling paper for this project, as these are already pre-cut to specific widths and come in a wide range of colors, but if you don't have any you can easily cut your own from white or colored copy paper. Just make sure that you cut against (or perpendicular to) the grain of the paper so that it's easy to coil the strips.
To find the grain of the paper, try gently rolling the paper into a tube in one direction first, and then in the other. The paper will resist if it is rolled in the same direction as the grain, but will be easier to roll against the direction of the grain. To cut the strips, use a paper trimmer if you have one, or use a ruler, sharp craft knife and cutting mat. Common widths of quilling paper are 1/8 inch, 1/4 inch and 3/8 inch.
You will need (for one flower, measuring approximately 3/4 inch in diameter):
* one strip 3/8 inch wide and 12 inches long for the petals
* one strip 1/8 wide and 8 inches long in a different color for the center
* sharp scissors
* quilling tool or cocktail toothpick
* craft glue
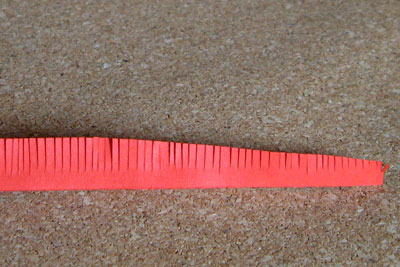
Fold the 12-inch strip into four sections. Fringe the strip with the scissors, cutting into the paper up to 1/8 inch from the edge.
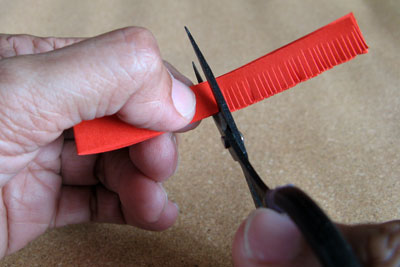
Unfold the paper. From one end of the strip, trim 2 inches of fringe at an angle.
Glue one end of the 8-inch strip to the angled end of the other strip and let dry.

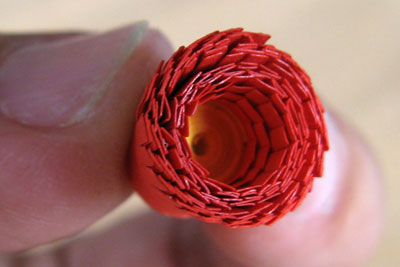
With the quilling tool or toothpick, carefully coil the whole strip starting from the narrow end. Make sure that the coil is tight and even.
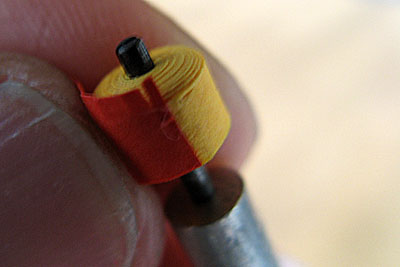
Secure the end of the coil with glue, and add a dab of glue on the bottom so it doesn't unravel.
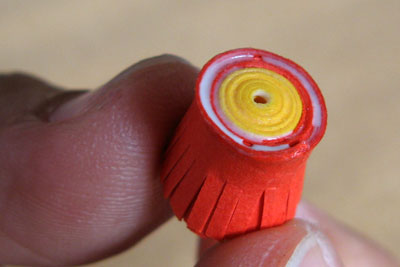
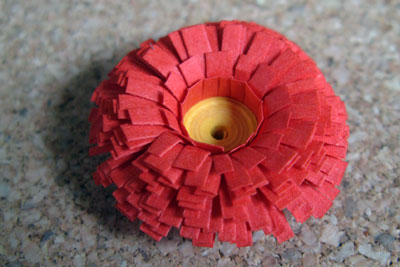
Now gently spread the fringes outward to resemble petals. You've just made a fringed flower!
It's fun to experiment with different colors of paper for the petals and the center. For instance, stick together strips of coordinating colors for the petals. Or color the top edge of the wide strip with a marker or metallic gel pen before fringing it, to give the tips of the petals a new look. You can also apply scrapbooking chalk (or eye shadow!) with a cotton swab to the inner petals near the center of the finished flower. To vary the size, experiment with varying lengths and widths of paper.
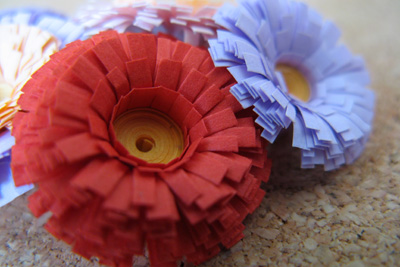
These fringed flowers make pretty embellishments for greeting cards, gift boxes, frames, and scrapbook pages. I hope you have fun making them!
To find the grain of the paper, try gently rolling the paper into a tube in one direction first, and then in the other. The paper will resist if it is rolled in the same direction as the grain, but will be easier to roll against the direction of the grain. To cut the strips, use a paper trimmer if you have one, or use a ruler, sharp craft knife and cutting mat. Common widths of quilling paper are 1/8 inch, 1/4 inch and 3/8 inch.
You will need (for one flower, measuring approximately 3/4 inch in diameter):
* one strip 3/8 inch wide and 12 inches long for the petals
* one strip 1/8 wide and 8 inches long in a different color for the center
* sharp scissors
* quilling tool or cocktail toothpick
* craft glue
Fold the 12-inch strip into four sections. Fringe the strip with the scissors, cutting into the paper up to 1/8 inch from the edge.
Unfold the paper. From one end of the strip, trim 2 inches of fringe at an angle.
Glue one end of the 8-inch strip to the angled end of the other strip and let dry.
With the quilling tool or toothpick, carefully coil the whole strip starting from the narrow end. Make sure that the coil is tight and even.
Secure the end of the coil with glue, and add a dab of glue on the bottom so it doesn't unravel.
Now gently spread the fringes outward to resemble petals. You've just made a fringed flower!
It's fun to experiment with different colors of paper for the petals and the center. For instance, stick together strips of coordinating colors for the petals. Or color the top edge of the wide strip with a marker or metallic gel pen before fringing it, to give the tips of the petals a new look. You can also apply scrapbooking chalk (or eye shadow!) with a cotton swab to the inner petals near the center of the finished flower. To vary the size, experiment with varying lengths and widths of paper.
These fringed flowers make pretty embellishments for greeting cards, gift boxes, frames, and scrapbook pages. I hope you have fun making them!
You Should Also Read:
Paper Rose

Related Articles
Editor's Picks Articles
Top Ten Articles
Previous Features
Site Map
Content copyright © 2023 by Mia C. Goloy. All rights reserved.
This content was written by Mia C. Goloy. If you wish to use this content in any manner, you need written permission. Contact Mia C. Goloy for details.
