
Gift Boxes from Toilet Paper Rolls

Recycle toilet paper rolls and turn them into boxes for small gifts. Here are some ideas to get you started. You can paper the rolls before folding and cutting them, or you can choose to gift wrap the boxes after they are made.
You will need:
* Toilet paper rolls, or paper towel rolls cut into halves
* Decorative paper
* Scissors
* Glue
* Adhesive tape
* Ribbons and other embellishments (optional)
Wrapped Roll
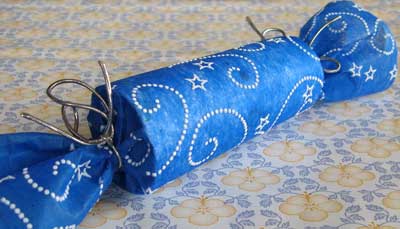
Take a sheet of decorative paper that is wide enough to go around the roll and twice as long as the roll itself. Wrap the paper around the roll and secure the paper with a bit of adhesive tape or glue, making sure that the paper extends beyond both ends of the roll. Gather the paper and tie a ribbon around both ends.
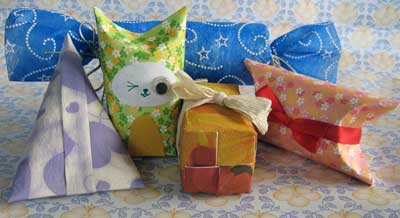
Pillow box
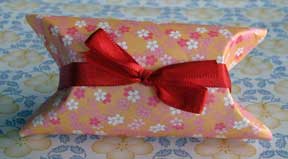
Press down on one end of the roll to fold the side inward, forming a flap. Fold in the other side too so that the flaps overlap. The flaps will be curved, forming pointy "ears" on the roll. Repeat with the other end of the roll. There's no need to seal the box, but you can do so with stickers, adhesive tape, or a ribbon tied around it lengthwise.
Triangular Box
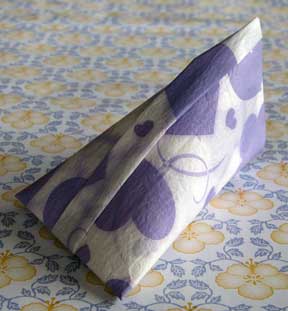
Carefully flatten one end of a roll so that the edges meet and form a straight line. Make sure that only the end of the roll is flattened, and not the whole side. Take the other end of the roll and flatten it in a direction perpendicular to the first one. Seal one end with adhesive tape and put your gift inside before taping the other end.
Rectangular Box
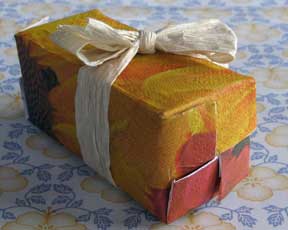
Flatten a roll, creasing the sides well. Fold the flattened roll in half lengthwise and crease the side. Unflatten the roll. With a scissors, carefully make a cut along one crease, about half the length of the short side of the rectangle (roughly half an inch). Do the same for the three other creases. Fold the resulting flaps inward, overlapping them to close one end of the roll. Repeat this for the other end of the roll. You can seal the box with adhesive tape or stickers. Add a ribbon if you wish.
Semi-pillow Box
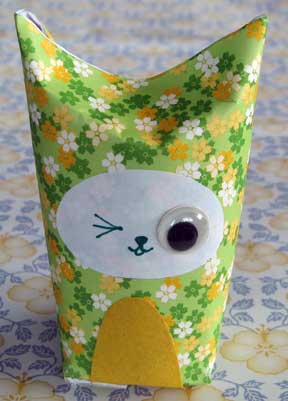
This is a combination of the pillow box and the rectangular box, which you can use to make creatures with pointy ears. To make the base, carefully crease and fold the bottom quarter of the roll so that you end up with four corners. Cut along the creases as explained for the Rectangular Box, and fold the flaps so that they overlap. To make the top, follow the directions for the Pillow Box, that is, fold the sides inward so that they overlap in a curve and form pointy ears. Add details like a face, legs, wings or a tail with markers, paints or paper cutouts.
You will need:
* Toilet paper rolls, or paper towel rolls cut into halves
* Decorative paper
* Scissors
* Glue
* Adhesive tape
* Ribbons and other embellishments (optional)
Wrapped Roll
Take a sheet of decorative paper that is wide enough to go around the roll and twice as long as the roll itself. Wrap the paper around the roll and secure the paper with a bit of adhesive tape or glue, making sure that the paper extends beyond both ends of the roll. Gather the paper and tie a ribbon around both ends.
Pillow box
Press down on one end of the roll to fold the side inward, forming a flap. Fold in the other side too so that the flaps overlap. The flaps will be curved, forming pointy "ears" on the roll. Repeat with the other end of the roll. There's no need to seal the box, but you can do so with stickers, adhesive tape, or a ribbon tied around it lengthwise.
Triangular Box
Carefully flatten one end of a roll so that the edges meet and form a straight line. Make sure that only the end of the roll is flattened, and not the whole side. Take the other end of the roll and flatten it in a direction perpendicular to the first one. Seal one end with adhesive tape and put your gift inside before taping the other end.
Rectangular Box
Flatten a roll, creasing the sides well. Fold the flattened roll in half lengthwise and crease the side. Unflatten the roll. With a scissors, carefully make a cut along one crease, about half the length of the short side of the rectangle (roughly half an inch). Do the same for the three other creases. Fold the resulting flaps inward, overlapping them to close one end of the roll. Repeat this for the other end of the roll. You can seal the box with adhesive tape or stickers. Add a ribbon if you wish.
Semi-pillow Box
This is a combination of the pillow box and the rectangular box, which you can use to make creatures with pointy ears. To make the base, carefully crease and fold the bottom quarter of the roll so that you end up with four corners. Cut along the creases as explained for the Rectangular Box, and fold the flaps so that they overlap. To make the top, follow the directions for the Pillow Box, that is, fold the sides inward so that they overlap in a curve and form pointy ears. Add details like a face, legs, wings or a tail with markers, paints or paper cutouts.

Related Articles
Editor's Picks Articles
Top Ten Articles
Previous Features
Site Map
Content copyright © 2023 by Mia C. Goloy. All rights reserved.
This content was written by Mia C. Goloy. If you wish to use this content in any manner, you need written permission. Contact Mia C. Goloy for details.
