
Father’s Day Pop-up Card

Tell Dad he’s your favorite all-time hero with this comic–book inspired pop-up card. You can easily change the colors of the cardstock and the name on the card to make it suitable for a young graduate, for example, or a favorite teacher. Write a personal note to make the recipient feel even more special!
You will need:
* Template sheet (available here)
* Diagram (available here)
* Blue cardstock, two pieces each measuring 8.5 x 5.5 inches
* Black cardstock
* Yellow cardstock
* Red cardstock
* Glue stick
* Double-sided tape
* Pencil
* Ruler
* Craft knife and cutting mat
* Scissors
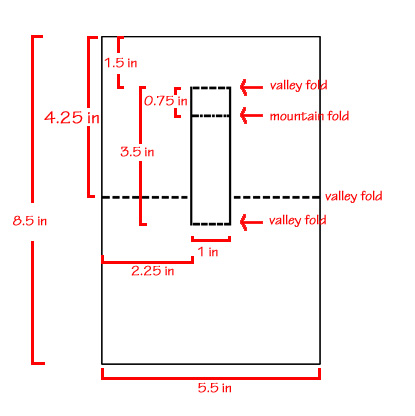
Mark, measure and cut the blue cardstock to the specified sizes. Take one of the blue cardstock pieces and, following the diagram, cut two slits measuring 3.5 inches down the middle of the cardstock (1.5 inches from the top and 2.25 inches from each side of the cardstock). Make score lines at the top and bottom of the slits to join them. Make another score line 0.75 inches below the top score line.
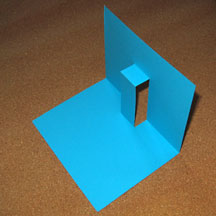
Next, mark a point on the cardstock that’s 4.25 inches from the top of the card for the card’s fold line. Score the fold line at this point, going from the sides of the card to the edges of the slits. Be careful not to score between the slits.
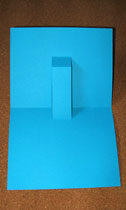
Now carefully fold along the score lines using the diagram and/or the photo as a guide; you should end up with a popup tab as shown. This is the inner card; set it aside for now.
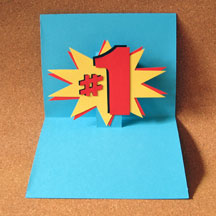
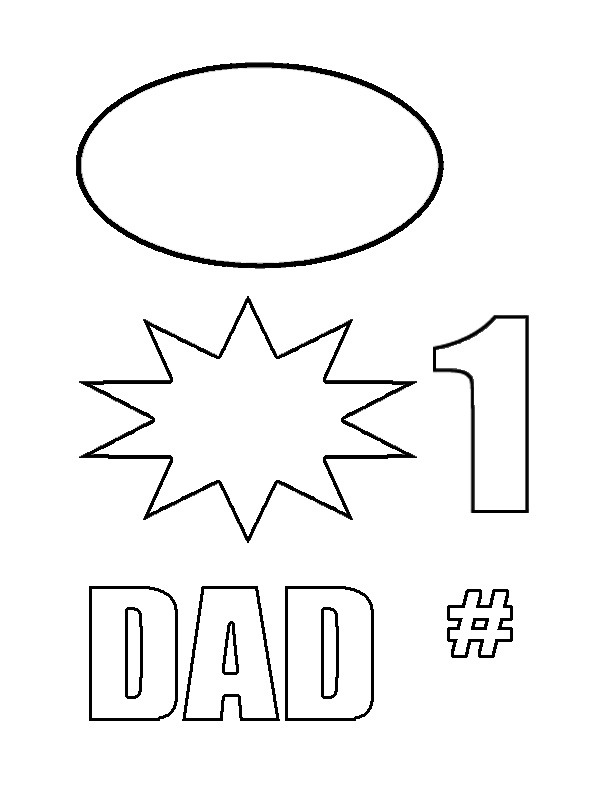
Using the template, trace and cut the starburst from red cardstock, and another from yellow cardstock. Use a glue stick to attach the yellow starburst to the red one, offsetting it a bit so that parts of the red starburst show from behind the yellow one.
Using the template, trace and cut two #’s, one from black cardstock and another from red cardstock. Stick the red # to the black #, offsetting it a bit to give a shadow effect.
Similarly, trace and cut two 1’s from the black and red cardstock. Glue the red 1 to the black 1, offsetting it as well.
Next, glue the # and the 1 to the starburst. Using double sided tape, attach the starburst to the popup tab, making sure that the points of the starburst don’t show when the card is closed. Set this aside.
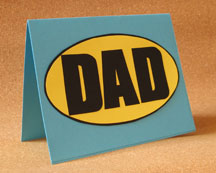
Take the second piece of blue cardstock, and score and fold it in half. Using the template, trace and cut the oval from yellow cardstock. Glue the oval to black cardstock and trim around it with scissors, leaving a narrow black border.
Trace and cut the word “DAD” from black cardstock and glue it to the oval. Glue the oval on the front of the card. This is the outer card.
Join the outer and inner cards using double sided tape or glue along the edges. Make sure that the tab isn’t glued down! Finally, with a pen, write the sentiment inside the card:
You top my list of superheroes! Happy Father’s Day!
You will need:
* Template sheet (available here)
* Diagram (available here)
* Blue cardstock, two pieces each measuring 8.5 x 5.5 inches
* Black cardstock
* Yellow cardstock
* Red cardstock
* Glue stick
* Double-sided tape
* Pencil
* Ruler
* Craft knife and cutting mat
* Scissors
Mark, measure and cut the blue cardstock to the specified sizes. Take one of the blue cardstock pieces and, following the diagram, cut two slits measuring 3.5 inches down the middle of the cardstock (1.5 inches from the top and 2.25 inches from each side of the cardstock). Make score lines at the top and bottom of the slits to join them. Make another score line 0.75 inches below the top score line.
Next, mark a point on the cardstock that’s 4.25 inches from the top of the card for the card’s fold line. Score the fold line at this point, going from the sides of the card to the edges of the slits. Be careful not to score between the slits.
Now carefully fold along the score lines using the diagram and/or the photo as a guide; you should end up with a popup tab as shown. This is the inner card; set it aside for now.
Using the template, trace and cut the starburst from red cardstock, and another from yellow cardstock. Use a glue stick to attach the yellow starburst to the red one, offsetting it a bit so that parts of the red starburst show from behind the yellow one.
Using the template, trace and cut two #’s, one from black cardstock and another from red cardstock. Stick the red # to the black #, offsetting it a bit to give a shadow effect.
Similarly, trace and cut two 1’s from the black and red cardstock. Glue the red 1 to the black 1, offsetting it as well.
Next, glue the # and the 1 to the starburst. Using double sided tape, attach the starburst to the popup tab, making sure that the points of the starburst don’t show when the card is closed. Set this aside.
Take the second piece of blue cardstock, and score and fold it in half. Using the template, trace and cut the oval from yellow cardstock. Glue the oval to black cardstock and trim around it with scissors, leaving a narrow black border.
Trace and cut the word “DAD” from black cardstock and glue it to the oval. Glue the oval on the front of the card. This is the outer card.
Join the outer and inner cards using double sided tape or glue along the edges. Make sure that the tab isn’t glued down! Finally, with a pen, write the sentiment inside the card:
You top my list of superheroes! Happy Father’s Day!

Related Articles
Editor's Picks Articles
Top Ten Articles
Previous Features
Site Map
Content copyright © 2023 by Mia C. Goloy. All rights reserved.
This content was written by Mia C. Goloy. If you wish to use this content in any manner, you need written permission. Contact Mia C. Goloy for details.
