Accurate Shape cutting and Machine Preparation

This is the third in the series of articles on Accurate Rotary Cutting and Machine Piecing. In the previous article we discussed the second essential element titled: Fabric Folding and Edge Trimming; with instructions for folding fabric into four, placing fabric onto the cutting board and trimming the edge ready for the first strip cut.
This article will deal with the cutting of strips, and then cutting of the required shapes. We will also be discussing machine preparation in readiness for accuracy in machine piecing.
Here is the list of fabric requirements, repeated from the first article. I have said previously that only a 10” x 10” piece of fabric is required for each color, but if you are able, it would be most beneficial if you could obtain a 20” x 44” piece for each fabric requirement and practice the folding and trimming that was outlined in the second article.
Four different colored fabrics –
light colored 4 x 1⅞” squares (e.g. beige) Stars triangle of Flying Geese
medium colored 1 x 3¼” square (e.g. rust) Filler triangle of Flying Geese
medium dark colored 4 x 1½” squares (e.g. navy blue) Four Corner Squares
dark colored 1 x 2½” square (e.g. burgundy) Inner Square
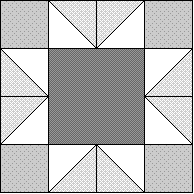
Below is a color graded illustration of the star. Notice the star triangles fabric is the lightest. It doesn’t really matter which other fabrics are used for the other pieces, it is important that the Star triangles stand out and are noticeable. (Technically speaking this is the lightest value of the fabrics, but that’s another series of articles on Value.)

In order to obtain accurate cutting EVERYTIME, only one shape should be cut from one strip at a time. If 4 squares are required to be cut accurately, then they need to be cut individually. The logic behind this option is: Measuring and cutting will only need to be checked and performed once. The individually cut pieces can then be put aside ready for piecing, with no doubt in the quilters mind that they have been accurately cut, because each was cut individually.
Some quilters like to pile one strip upon another and cut through two, three or maybe four strips all at once. I’ve often asked quilters why they do this, and most often their reply is “to save time”. I am not convinced that this will result in accurately cut shapes or save time. How can they be sure that the multiple strips are sitting in perfect line on top of one another and cutting through the thickness will not alter or move the strips whilst cutting? Over the many years I’ve been rotary cutting, I have discovered that the odds for me to make mistakes in quilting are pretty high, so I’m just minimizing the odds in the preparation and cutting.
The first fabric to cut is the lightest and these will be the Stars Triangle. Cut 1 x 1⅞” strip. Lay your strip on the board, line up your ruler (not the board) to cut 1⅞” squares. Cut each one individually, and then place to the side.
The second fabric to cut is the Medium and you will be cutting 1 x 3¼” strip, and from this strip, cut 1 x 3¼” square. Place to the side.
The third fabric to cut is the Medium Dark and you will be cutting 1 x 1½” strip, and from this strip, cut 4 x 1½” squares. Place to the side.
The fourth and final fabric is the darkest fabric and you will be cutting 1 x 2½” strip, and from this strip, cut 1 x 2½” square. Place to the side.

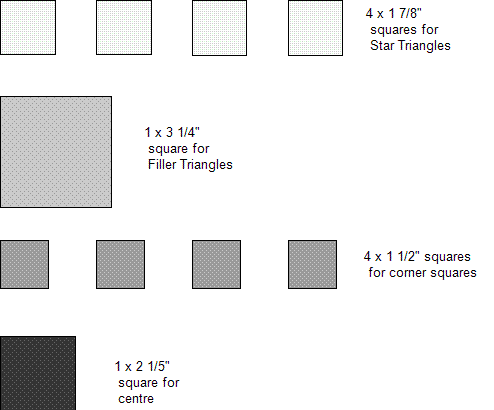
Lay the fabrics out similar to the diagram above. You are now just about ready to machine piece.
It’s important to have the machine prepared for accurate machine piecing. The items that particularly need attention are thread, ¼” foot and stitch length. Thread the machine and bobbin with the same thread. That’s really important. This means that the top stitch and bottom stitch will be behave the same way. Next put your ¼” foot onto the machine.
And lastly alter the stitch length. Normal stitch length is approximately 2.5 on most machines. For accurate machine piecing with piecing that is smaller than 5” pieces, it’s important to drop the stitch length to about 2. By reducing the stitch length, the frequency of seams coming undone is reduced also. Another hint is to reduce the speed control on your machine (if that’s possible). If your machine doesn’t have an automatic speed regulator, just reduce the pressure on your foot control. By slowing down, accuracy is more likely to happen.
Does your machine like to gobble up your first piecing, sucking it down into the feed dogs? My final hint to you is to prepare some “run ons” and “run offs”. These are scraps of fabric that would normally end up in the bin. These pieces of scrap fabric are usually about 2” wide and about 6” long. Fold this over double longwise and place it under your machine needle. Sew a straight line, right down the middle, to the end of the fabric piece. You have created a “run on”. Now you can begin your piecing, and your thread is actually embedded into the “run on” which means your piecing won’t get gobbled up by the feed dogs. Conversely, when you have finished your last piecing, use a “run off” and sew across this fabric and then cut the thread, leaving the “run off” under the machine, ready for the next piecing, with the thread already embedded. It works wonders, give it a go!
Here’s a picture diagram to illustrate the above:

Next article will contain instructions for accurate machine piecing, pressing and pinning. If you have any questions regarding this article please go to the forum titled Accurate Cutting for Accurate Machine Piecing, and post your queries here. I’ll answer your questions promptly.
This article will deal with the cutting of strips, and then cutting of the required shapes. We will also be discussing machine preparation in readiness for accuracy in machine piecing.
Here is the list of fabric requirements, repeated from the first article. I have said previously that only a 10” x 10” piece of fabric is required for each color, but if you are able, it would be most beneficial if you could obtain a 20” x 44” piece for each fabric requirement and practice the folding and trimming that was outlined in the second article.
Four different colored fabrics –
light colored 4 x 1⅞” squares (e.g. beige) Stars triangle of Flying Geese
medium colored 1 x 3¼” square (e.g. rust) Filler triangle of Flying Geese
medium dark colored 4 x 1½” squares (e.g. navy blue) Four Corner Squares
dark colored 1 x 2½” square (e.g. burgundy) Inner Square
Below is a color graded illustration of the star. Notice the star triangles fabric is the lightest. It doesn’t really matter which other fabrics are used for the other pieces, it is important that the Star triangles stand out and are noticeable. (Technically speaking this is the lightest value of the fabrics, but that’s another series of articles on Value.)

In order to obtain accurate cutting EVERYTIME, only one shape should be cut from one strip at a time. If 4 squares are required to be cut accurately, then they need to be cut individually. The logic behind this option is: Measuring and cutting will only need to be checked and performed once. The individually cut pieces can then be put aside ready for piecing, with no doubt in the quilters mind that they have been accurately cut, because each was cut individually.
Some quilters like to pile one strip upon another and cut through two, three or maybe four strips all at once. I’ve often asked quilters why they do this, and most often their reply is “to save time”. I am not convinced that this will result in accurately cut shapes or save time. How can they be sure that the multiple strips are sitting in perfect line on top of one another and cutting through the thickness will not alter or move the strips whilst cutting? Over the many years I’ve been rotary cutting, I have discovered that the odds for me to make mistakes in quilting are pretty high, so I’m just minimizing the odds in the preparation and cutting.
The first fabric to cut is the lightest and these will be the Stars Triangle. Cut 1 x 1⅞” strip. Lay your strip on the board, line up your ruler (not the board) to cut 1⅞” squares. Cut each one individually, and then place to the side.
The second fabric to cut is the Medium and you will be cutting 1 x 3¼” strip, and from this strip, cut 1 x 3¼” square. Place to the side.
The third fabric to cut is the Medium Dark and you will be cutting 1 x 1½” strip, and from this strip, cut 4 x 1½” squares. Place to the side.
The fourth and final fabric is the darkest fabric and you will be cutting 1 x 2½” strip, and from this strip, cut 1 x 2½” square. Place to the side.

Lay the fabrics out similar to the diagram above. You are now just about ready to machine piece.
It’s important to have the machine prepared for accurate machine piecing. The items that particularly need attention are thread, ¼” foot and stitch length. Thread the machine and bobbin with the same thread. That’s really important. This means that the top stitch and bottom stitch will be behave the same way. Next put your ¼” foot onto the machine.
And lastly alter the stitch length. Normal stitch length is approximately 2.5 on most machines. For accurate machine piecing with piecing that is smaller than 5” pieces, it’s important to drop the stitch length to about 2. By reducing the stitch length, the frequency of seams coming undone is reduced also. Another hint is to reduce the speed control on your machine (if that’s possible). If your machine doesn’t have an automatic speed regulator, just reduce the pressure on your foot control. By slowing down, accuracy is more likely to happen.
Does your machine like to gobble up your first piecing, sucking it down into the feed dogs? My final hint to you is to prepare some “run ons” and “run offs”. These are scraps of fabric that would normally end up in the bin. These pieces of scrap fabric are usually about 2” wide and about 6” long. Fold this over double longwise and place it under your machine needle. Sew a straight line, right down the middle, to the end of the fabric piece. You have created a “run on”. Now you can begin your piecing, and your thread is actually embedded into the “run on” which means your piecing won’t get gobbled up by the feed dogs. Conversely, when you have finished your last piecing, use a “run off” and sew across this fabric and then cut the thread, leaving the “run off” under the machine, ready for the next piecing, with the thread already embedded. It works wonders, give it a go!
Here’s a picture diagram to illustrate the above:

Next article will contain instructions for accurate machine piecing, pressing and pinning. If you have any questions regarding this article please go to the forum titled Accurate Cutting for Accurate Machine Piecing, and post your queries here. I’ll answer your questions promptly.
You Should Also Read:
Part 1: Fabric Prepation for Accurate Machine Piecing
Part 2: Fabric folding and Edge Trimming for Accurate Machine Piecing

Related Articles
Editor's Picks Articles
Top Ten Articles
Previous Features
Site Map
Content copyright © 2023 by Judie Bellingham. All rights reserved.
This content was written by Judie Bellingham. If you wish to use this content in any manner, you need written permission. Contact Judie Bellingham for details.


